IBM 3580-L23 Setup Guide - Page 110
Reminder, not seat the pin into the cartridge
 |
View all IBM 3580-L23 manuals
Add to My Manuals
Save this manual to your list of manuals |
Page 110 highlights
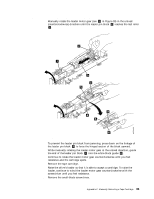
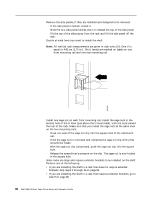
3. If necessary, use needle-nose pliers to grasp the end of the leader pin and pull it out of the cartridge so that you can grip it with your fingers (see 1 in Figure 32). Reminder: The following step requires care. Success depends on your ability to maintain constant and appropriate tension on the tape while rewinding it into the cartridge. Apply too much tension and the tape may break; apply too little tension and the leader pin may fall from the leader block. Perform the steps slowly and carefully to avoid complications. 4. While keeping the tape taut with your fingers, rotate the allen wrench clockwise 2 to wind the excess tape into the cartridge. Guide the leader pin toward the cartridge and drop it deep inside the cartridge door; do not attempt to seat the leader pin. Remove the allen wrench. Note: Ensure that the leader pin drops into the opened cartridge door, falls deeply into the cartridge, and does not jam near the cartridge door. Do not seat the pin into the cartridge's clips; this will interfere with the motion of the leader pin block (you can seat the pin after you have removed the cartridge from the drive). If the tape did not load because the leader pin was wedged in the clip area, grasp the leader pin with needle-nose pliers to free it and drop it into the cartridge. Figure 32. Rewinding the leader pin into the tape cartridge 94 IBM 3580 Ultrium Tape Drive Setup and Operator Guide
-
 1
1 -
2
-
3
-
4
-
5
-
6
-
7
-
8
-
9
-
10
-
11
-
12
-
13
-
14
-
15
-
16
-
17
-
18
-
19
-
20
-
21
-
22
-
23
-
24
-
25
-
26
-
27
-
28
-
29
-
30
-
31
-
32
-
33
-
34
-
35
-
36
-
37
-
38
-
39
-
40
-
41
-
42
-
43
-
44
-
45
-
46
-
47
-
48
-
49
-
50
-
51
-
52
-
53
-
54
-
55
-
56
-
57
-
58
-
59
-
60
-
61
-
62
-
63
-
64
-
65
-
66
-
67
-
68
-
69
-
70
-
71
-
72
-
73
-
74
-
75
-
76
-
77
-
78
-
79
-
80
-
81
-
82
-
83
-
84
-
85
-
86
-
87
-
88
-
89
-
90
-
91
-
92
-
93
-
94
-
95
-
96
-
97
-
98
-
99
-
100
-
101
-
102
-
103
-
104
-
 105
105 -
 106
106 -
 107
107 -
 108
108 -
 109
109 -
 110
110 -
 111
111 -
 112
112 -
 113
113 -
 114
114 -
 115
115 -
116
-
117
-
118
-
119
-
120
-
121
-
122
-
123
-
124
-
125
-
126
-
127
-
128
-
129
-
130
-
131
-
132
-
133
-
134
-
135
-
136
-
137
-
138
-
139
-
140
-
141
-
142
-
143
-
144
-
145
-
146
-
147
-
148
-
149
 |
 |
