IBM 3580-L23 Setup Guide - Page 117
Removing the Shelf from the Rack, are installed.
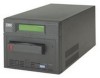 |
View all IBM 3580-L23 manuals
Add to My Manuals
Save this manual to your list of manuals |
Page 117 highlights
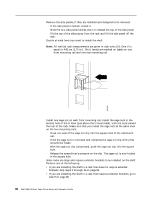
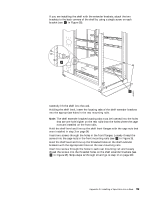
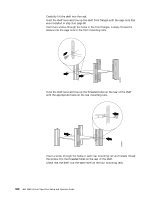
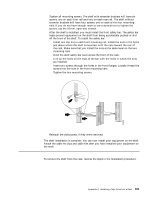
18. Tighten all mounting screws. The shelf with extender brackets will have six screws: one on each front rail and two on each rear rail. The shelf without extender brackets will have four screws: one on each of the four mounting rails. If you do not have enough room to use a screwdriver to tighten the screws, use the 10-mm, open-end wrench. 19. After the shelf is installed, you must install the front safety bar. The safety bar helps prevent equipment on the shelf from being accidentally pushed or slid off the front of the shelf. To install the safety bar: a. Install one clip nut in each front mounting rail. Install the nuts in the holes just above where the shelf is mounted, with the nuts toward the rear of the rack. Make sure that you install the nuts at the same level on the two mounting rails. b. Hold the shelf safety bar level across the front of the rack. c. Line up the holes on the ends of the bar with the holes in which the nuts are installed. d. Insert two screws through the holes in the front flanges. Loosely thread the screws into the nuts in the front mounting rails. e. Tighten the two mounting screws. Figure 38. Attaching the front safety bar to the mounting rails 20. Reinstall the side panels, if they were removed. The shelf installation is complete. You can now install your equipment on the shelf. Attach the cable tie clips and cable ties after you have installed your equipment on the shelf. Removing the Shelf from the Rack To remove the shelf from the rack, reverse the steps in the installation procedure. Appendix D. Installing a Tape Drive into a Rack 101
-
 1
1 -
2
-
3
-
4
-
5
-
6
-
7
-
8
-
9
-
10
-
11
-
12
-
13
-
14
-
15
-
16
-
17
-
18
-
19
-
20
-
21
-
22
-
23
-
24
-
25
-
26
-
27
-
28
-
29
-
30
-
31
-
32
-
33
-
34
-
35
-
36
-
37
-
38
-
39
-
40
-
41
-
42
-
43
-
44
-
45
-
46
-
47
-
48
-
49
-
50
-
51
-
52
-
53
-
54
-
55
-
56
-
57
-
58
-
59
-
60
-
61
-
62
-
63
-
64
-
65
-
66
-
67
-
68
-
69
-
70
-
71
-
72
-
73
-
74
-
75
-
76
-
77
-
78
-
79
-
80
-
81
-
82
-
83
-
84
-
85
-
86
-
87
-
88
-
89
-
90
-
91
-
92
-
93
-
94
-
95
-
96
-
97
-
98
-
99
-
100
-
101
-
102
-
103
-
104
-
105
-
106
-
107
-
108
-
109
-
110
-
111
-
 112
112 -
 113
113 -
 114
114 -
 115
115 -
 116
116 -
 117
117 -
 118
118 -
 119
119 -
 120
120 -
 121
121 -
 122
122 -
123
-
124
-
125
-
126
-
127
-
128
-
129
-
130
-
131
-
132
-
133
-
134
-
135
-
136
-
137
-
138
-
139
-
140
-
141
-
142
-
143
-
144
-
145
-
146
-
147
-
148
-
149
 |
 |
