IBM 3580-L23 Setup Guide - Page 109
Removing the Cover of the Internal Drive, Fixing the Problem
 |
View all IBM 3580-L23 manuals
Add to My Manuals
Save this manual to your list of manuals |
Page 109 highlights
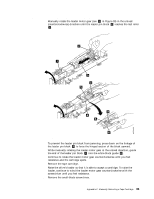
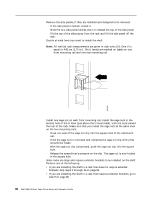
Removing the Cover of the Internal Drive 1. Using a Phillips screwdriver, remove the three screws and washers (see 1 in Figure 31) that secure the bezel 2 to the internal drive 3 , then remove the bezel. 2. Remove the cover of the internal drive by performing the following steps: a. Remove the four cover-mounting screws and washers 4 . b. Remove the cover 5 by lifting it up. Figure 31. Removing the cover from the internal drive Fixing the Problem 1. Place the tape drive on its side as shown in Figure 32 on page 94. 2. Examine the tape to determine the source of the problem: v If the leader pin is jammed in the cartridge, go to the Note contained in step 4 on page 94. v If the leader pin has become detached from the leader block and is lying in the tape path, go to step 3 on page 94. v If the leader pin has broken away from the tape, go to "Repositioning or Reattaching a Leader Pin" on page 35. v If the tape has broken between the supply reel and the takeup reel, contact IBM Technical Support. Appendix C. Manually Removing a Tape Cartridge 93
-
 1
1 -
2
-
3
-
4
-
5
-
6
-
7
-
8
-
9
-
10
-
11
-
12
-
13
-
14
-
15
-
16
-
17
-
18
-
19
-
20
-
21
-
22
-
23
-
24
-
25
-
26
-
27
-
28
-
29
-
30
-
31
-
32
-
33
-
34
-
35
-
36
-
37
-
38
-
39
-
40
-
41
-
42
-
43
-
44
-
45
-
46
-
47
-
48
-
49
-
50
-
51
-
52
-
53
-
54
-
55
-
56
-
57
-
58
-
59
-
60
-
61
-
62
-
63
-
64
-
65
-
66
-
67
-
68
-
69
-
70
-
71
-
72
-
73
-
74
-
75
-
76
-
77
-
78
-
79
-
80
-
81
-
82
-
83
-
84
-
85
-
86
-
87
-
88
-
89
-
90
-
91
-
92
-
93
-
94
-
95
-
96
-
97
-
98
-
99
-
100
-
101
-
102
-
103
-
 104
104 -
 105
105 -
 106
106 -
 107
107 -
 108
108 -
 109
109 -
 110
110 -
 111
111 -
 112
112 -
 113
113 -
 114
114 -
115
-
116
-
117
-
118
-
119
-
120
-
121
-
122
-
123
-
124
-
125
-
126
-
127
-
128
-
129
-
130
-
131
-
132
-
133
-
134
-
135
-
136
-
137
-
138
-
139
-
140
-
141
-
142
-
143
-
144
-
145
-
146
-
147
-
148
-
149
 |
 |
