IBM 867431X Hardware Maintenance Manual - Page 98
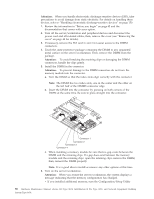
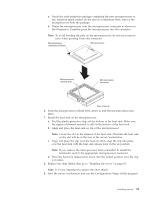
Removing a microprocessor, Firmly grasp the heat sink and lift it off the microprocessor.
 |
View all IBM 867431X manuals
Add to My Manuals
Save this manual to your list of manuals |
Page 98 highlights
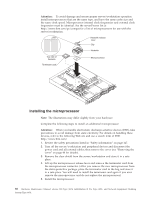
Removing a microprocessor Do the following to remove a microprocessor: Note: Do not use any tools when removing the microprocessor. Attention: When you handle Electrostatic Discharge-Sensitive devices (ESD), take precautions to avoid damage from static electricity. For details on handling these devices, refer to "Handling electrostatic discharge-sensitive devices" on page 150. 1. Review the safety precautions listed in "Safety information" on page 147. 2. Turn off the server/workstation and peripheral devices and disconnect the power cord and all external cables; then remove the cover (see "Removing the cover" on page 48 for details). 3. Remove the clear shield from the server/workstation and store it in a safe place. 4. To remove microprocessor #2: a. Remove the clip from the heat sink by pushing forward on the back of the clip and up on the lever. After the clip releases from the heat sink, lift it up and off the heat sink. Note: A thermal material is used between the heatsink and the processor. This material, when heated and cooled, causes the heatsink to adhere to the processor. Some force may be required to remove the heatsink. b. Firmly grasp the heat sink and lift it off the microprocessor. Attention: Do not use excessive force or tools to remove the heatsink. c. Discard the used heatsink. d. Lift up the release lever and remove the microprocessor from the connector. Store the microprocessor in a static-protective bag for possible future use. Note: If you are installing a new microprocessor, go to "Installing the microprocessor" on page 88. If you are not replacing the microprocessor, then you must reinstall the terminator card. Push the release latch down to lock the terminator card into place. Note: It is very important to replace the clear shield. 90 Hardware Maintenance Manual: xSeries 330 Type 8674, IntelliStation R Pro Type 6851, and Network Equipment Building System Type 8674
-
 1
1 -
2
-
3
-
4
-
5
-
6
-
7
-
8
-
9
-
10
-
11
-
12
-
13
-
14
-
15
-
16
-
17
-
18
-
19
-
20
-
21
-
22
-
23
-
24
-
25
-
26
-
27
-
28
-
29
-
30
-
31
-
32
-
33
-
34
-
35
-
36
-
37
-
38
-
39
-
40
-
41
-
42
-
43
-
44
-
45
-
46
-
47
-
48
-
49
-
50
-
51
-
52
-
53
-
54
-
55
-
56
-
57
-
58
-
59
-
60
-
61
-
62
-
63
-
64
-
65
-
66
-
67
-
68
-
69
-
70
-
71
-
72
-
73
-
74
-
75
-
76
-
77
-
78
-
79
-
80
-
81
-
82
-
83
-
84
-
85
-
86
-
87
-
88
-
89
-
90
-
91
-
92
-
 93
93 -
 94
94 -
 95
95 -
 96
96 -
 97
97 -
 98
98 -
 99
99 -
 100
100 -
 101
101 -
 102
102 -
 103
103 -
104
-
105
-
106
-
107
-
108
-
109
-
110
-
111
-
112
-
113
-
114
-
115
-
116
-
117
-
118
-
119
-
120
-
121
-
122
-
123
-
124
-
125
-
126
-
127
-
128
-
129
-
130
-
131
-
132
-
133
-
134
-
135
-
136
-
137
-
138
-
139
-
140
-
141
-
142
-
143
-
144
-
145
-
146
-
147
-
148
-
149
-
150
-
151
-
152
-
153
-
154
-
155
-
156
-
157
-
158
-
159
-
160
-
161
-
162
-
163
-
164
-
165
-
166
-
167
-
168
-
169
-
170
-
171
-
172
-
173
-
174
-
175
-
176
-
177
-
178
-
179
-
180
-
181
-
182
-
183
-
184
-
185
-
186
-
187
-
188
-
189
-
190
-
191
-
192
 |
 |
