Intel SR1530HCLRNA User Guide - Page 67
Connecting Hard Drive Power and Data Cables SR1530CL, SR1530CLR
 |
UPC - 735858197274
View all Intel SR1530HCLRNA manuals
Add to My Manuals
Save this manual to your list of manuals |
Page 67 highlights
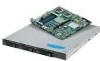
10. HDD1 only: Route the power cable into the cable clip on the top of the hard drive bracket. 11. Connect the data cables to the drive(s). - If a drive is installed in the HDD0 carrier, connect the HDD0 data cable to the SATA 0 connector on the server board. See letter "A" in Figure 39. - If a drive is installed in the HDD1 carrier, connect the HDD1 data cable to the SATA 1 connector on the server board. See letter "B" in Figure 39. Note: The data cables are factory routed underneath the fan module. Use caution to make sure you connect the cables between the server board and the hard drives. The cables are labeled at each end. 12. Connect the power cables to the drive(s): - If a drive is installed in the HDD1 carrier, attach the connector on the daisy chain power cable that is closest to the power supply to the HDD1 connector. See letter "D" in Figure 39. - If a drive is installed in the HDD0 carrier, attach the middle connector on the daisy chain power cable to the HDD0 power connector. See letter "C" in Figure 39. B A1 0 HDD 0 C A B D HDD 1 AF001178 Figure 39. Connecting Hard Drive Power and Data Cables (SR1530CL/ SR1530CLR) Server System User Guide 45
-
 1
1 -
2
-
3
-
4
-
5
-
6
-
7
-
8
-
9
-
10
-
11
-
12
-
13
-
14
-
15
-
16
-
17
-
18
-
19
-
20
-
21
-
22
-
23
-
24
-
25
-
26
-
27
-
28
-
29
-
30
-
31
-
32
-
33
-
34
-
35
-
36
-
37
-
38
-
39
-
40
-
41
-
42
-
43
-
44
-
45
-
46
-
47
-
48
-
49
-
50
-
51
-
52
-
53
-
54
-
55
-
56
-
57
-
58
-
59
-
60
-
61
-
 62
62 -
 63
63 -
 64
64 -
 65
65 -
 66
66 -
 67
67 -
 68
68 -
 69
69 -
 70
70 -
 71
71 -
 72
72 -
73
-
74
-
75
-
76
-
77
-
78
-
79
-
80
-
81
-
82
-
83
-
84
-
85
-
86
-
87
-
88
-
89
-
90
-
91
-
92
-
93
-
94
-
95
-
96
-
97
-
98
-
99
-
100
-
101
-
102
-
103
-
104
-
105
-
106
-
107
-
108
-
109
-
110
-
111
-
112
-
113
-
114
-
115
-
116
-
117
-
118
-
119
-
120
-
121
-
122
-
123
-
124
-
125
-
126
-
127
-
128
-
129
-
130
-
131
-
132
-
133
-
134
-
135
-
136
-
137
-
138
-
139
-
140
-
141
-
142
-
143
-
144
-
145
-
146
-
147
-
148
-
149
-
150
-
151
-
152
-
153
-
154
-
155
-
156
-
157
-
158
-
159
-
160
-
161
-
162
-
163
-
164
-
165
-
166
-
167
-
168
-
169
-
170
-
171
-
172
-
173
-
174
-
175
-
176
-
177
-
178
-
179
-
180
-
181
-
182
-
183
-
184
-
185
-
186
-
187
-
188
-
189
-
190
-
191
-
192
-
193
-
194
 |
 |
