Invacare SOLARA3G Owners Manual - Page 116
Securing the Occupant, Wheelchair-Anchored Belts
 |
View all Invacare SOLARA3G manuals
Add to My Manuals
Save this manual to your list of manuals |
Page 116 highlights
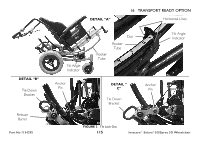
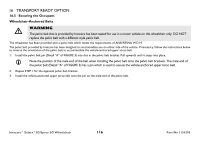
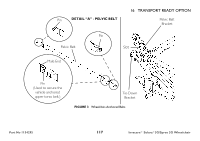
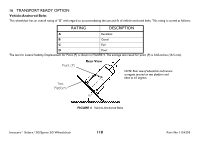
16 TRANSPORT READY OPTION 16.5 Securing the Occupant Wheelchair-Anchored Belts ƽ WARNING The pelvic belt that is provided by Invacare has been tested for use in a motor vehicle on this wheelchair only. DO NOT replace the pelvic belt with a different style pelvic belt. The wheelchair has been provided with a pelvic belt which meets the requirements of ANSI/RESNA WC/19. The pelvic belt provided by Invacare has been designed to accommodate use on either side of the vehicle. If necessary, follow the instructions below to reverse the orientation of the pelvic belt to accommodate the vehicle-anchored upper torso belt. 1. Install the pelvic belt pin (Detail "A" of FIGURE 3) into slot in the pelvic belt bracket. Pull upwards until it snaps into place. Note the position of the male end of the belt when installing the pelvic belt onto the pelvic belt brackets. The male end of the pelvic belt (Detail "A" of FIGURE 3) has a pin which is used to secure the vehicle-anchored upper torso belt. 2. Repeat STEP 1 for the opposite pelvic belt bracket. 3. Install the vehicle-anchored upper torso belt onto the pin on the male end of the pelvic belt. Invacare® Solara®3G/Spree 3G Wheelchair 116 Part No 1154295
-
 1
1 -
2
-
3
-
4
-
5
-
6
-
7
-
8
-
9
-
10
-
11
-
12
-
13
-
14
-
15
-
16
-
17
-
18
-
19
-
20
-
21
-
22
-
23
-
24
-
25
-
26
-
27
-
28
-
29
-
30
-
31
-
32
-
33
-
34
-
35
-
36
-
37
-
38
-
39
-
40
-
41
-
42
-
43
-
44
-
45
-
46
-
47
-
48
-
49
-
50
-
51
-
52
-
53
-
54
-
55
-
56
-
57
-
58
-
59
-
60
-
61
-
62
-
63
-
64
-
65
-
66
-
67
-
68
-
69
-
70
-
71
-
72
-
73
-
74
-
75
-
76
-
77
-
78
-
79
-
80
-
81
-
82
-
83
-
84
-
85
-
86
-
87
-
88
-
89
-
90
-
91
-
92
-
93
-
94
-
95
-
96
-
97
-
98
-
99
-
100
-
101
-
102
-
103
-
104
-
105
-
106
-
107
-
108
-
109
-
110
-
 111
111 -
 112
112 -
 113
113 -
 114
114 -
 115
115 -
 116
116 -
 117
117 -
 118
118 -
 119
119 -
 120
120 -
 121
121 -
122
-
123
-
124
 |
 |
