Invacare SOLARA3G Owners Manual - Page 71
Installing/Removing Non-Adjustable Stroller Handles, Installing Stroller Handles, Removing Stroller
 |
View all Invacare SOLARA3G manuals
Add to My Manuals
Save this manual to your list of manuals |
Page 71 highlights
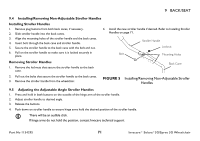
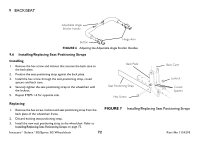
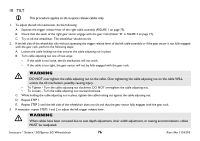
9 BACK/SEAT 9.4 Installing/Removing Non-Adjustable Stroller Handles Installing Stroller Handles 1. Remove plug buttons from both back canes, if necessary. 2. Slide stroller handle into the back canes. 3. Align the mounting holes of the stroller handle and the back canes. 4. Insert bolt through the back cane and stroller handle. 5. Secure the stroller handle to the back cane with the bolt and nut. 6. Pull on the stroller handle to make sure it is locked securely in place. 4. Install the new stroller handle if desired. Refer to Installing Stroller Handles on page 71. Stroller Handle Locknut Bolt Mounting Holes Removing Stroller Handles 1. Remove the locknuts that secure the stroller handle to the back cane. Back Cane 2. Pull out the bolts that secure the stroller handle to the back canes. 3. Remove the stroller handle from the wheelchair. FIGURE 5 Installing/Removing Non-Adjustable Stroller Handles 9.5 Adjusting the Adjustable Angle Stroller Handles 1. Press and hold in both buttons on the outside of the hinge arm of the stroller handle. 2. Adjust stroller handle to desired angle. 3. Release the buttons. 4. Push down on stroller handle to ensure hinge arms hold the desired position of the stroller handle. There will be an audible click. If hinge arms do not hold the position, contact Invacare technical support Part No 1154295 71 Invacare® Solara®3G/Spree 3G Wheelchair
-
 1
1 -
2
-
3
-
4
-
5
-
6
-
7
-
8
-
9
-
10
-
11
-
12
-
13
-
14
-
15
-
16
-
17
-
18
-
19
-
20
-
21
-
22
-
23
-
24
-
25
-
26
-
27
-
28
-
29
-
30
-
31
-
32
-
33
-
34
-
35
-
36
-
37
-
38
-
39
-
40
-
41
-
42
-
43
-
44
-
45
-
46
-
47
-
48
-
49
-
50
-
51
-
52
-
53
-
54
-
55
-
56
-
57
-
58
-
59
-
60
-
61
-
62
-
63
-
64
-
65
-
 66
66 -
 67
67 -
 68
68 -
 69
69 -
 70
70 -
 71
71 -
 72
72 -
 73
73 -
 74
74 -
 75
75 -
 76
76 -
77
-
78
-
79
-
80
-
81
-
82
-
83
-
84
-
85
-
86
-
87
-
88
-
89
-
90
-
91
-
92
-
93
-
94
-
95
-
96
-
97
-
98
-
99
-
100
-
101
-
102
-
103
-
104
-
105
-
106
-
107
-
108
-
109
-
110
-
111
-
112
-
113
-
114
-
115
-
116
-
117
-
118
-
119
-
120
-
121
-
122
-
123
-
124
 |
 |
