Kenmore HE2t User Guide - Page 16
Secure The Drain Hose, Level The Washer - washer parts
 |
View all Kenmore HE2t manuals
Add to My Manuals
Save this manual to your list of manuals |
Page 16 highlights
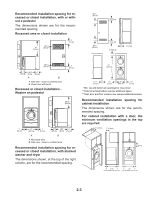
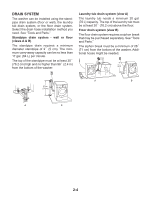
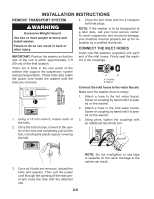
To keep drain water from going back into the washer: • Do not straighten the drain hose, and do not force excess drain hose into standpipe. Hose should be secure, but loose enough to provide a gap for air. • Do not lay excess hose on the bottom of the laundry tub. Floor drain You may need additional parts. See Floor Drain under "Tools and Parts." SECURE THE DRAIN HOSE 1. Drape the power cord over the washer top. 2. Move the washer to its final location. 3. Place the drain hose in the laundry tub or standpipe. See illustrations A and B. A B C 4. If the washer faucets and the drain standpipe are recessed, put the hooked end of the drain hose in the standpipe. See illustration C. NOTES: • Do not force excess drain hose back into the rear of the washer. • To prevent siphoning, do not seal the drain hose into the standpipe. LEVEL THE WASHER One foot has been installed at a different height on your new washer. The other three feet were preset at the factory. Properly leveling your washer will minimize excessive noise and vibration. 1. Push on the upper front panel to be sure that the washer is on the rear feet. Lower the right front foot until it contacts the floor. Check the levelness of the washer by placing a level on the top edge of the washer, first side to side, then front to back. If the washer is against a wall, move the washer out slightly before tipping back. First prop the front with a wood block and adjust the feet as necessary; then prop the back and adjust feet as necessary. Repeat this step until washer is level. 2. Make sure that all four feet are stable and resting on the floor. Then check that the appliance is perfectly level (use a level). 3. After the washer is level, use a 17 mm open-end wrench to turn the nuts on the feet tightly against the washer cabinet. IMPORTANT: All four feet must be tightened. If the nuts are not tight against the washer cabinet, the washer may vibrate. 4. When you are pushing on the edges of the washing machine top plate, the machine should not move front to back, side to side, or diagonally. 5. Slide the washer to its final location. 6. Confirm the levelness of the washer. 2-8
-
 1
1 -
2
-
3
-
4
-
5
-
6
-
7
-
8
-
9
-
10
-
 11
11 -
 12
12 -
 13
13 -
 14
14 -
 15
15 -
 16
16 -
 17
17 -
 18
18 -
 19
19 -
 20
20 -
 21
21 -
22
-
23
-
24
-
25
-
26
-
27
-
28
-
29
-
30
-
31
-
32
-
33
-
34
-
35
-
36
-
37
-
38
-
39
-
40
-
41
-
42
-
43
-
44
-
45
-
46
-
47
-
48
-
49
-
50
-
51
-
52
-
53
-
54
-
55
-
56
-
57
-
58
-
59
-
60
-
61
-
62
-
63
-
64
-
65
-
66
-
67
-
68
-
69
-
70
-
71
-
72
-
73
-
74
-
75
-
76
-
77
-
78
-
79
-
80
-
81
-
82
-
83
-
84
-
85
-
86
-
87
-
88
-
89
-
90
-
91
-
92
-
93
-
94
-
95
-
96
 |
 |
