Kenmore HE2t User Guide - Page 48
Removing The Detergent Dispenser Assembly
 |
View all Kenmore HE2t manuals
Add to My Manuals
Save this manual to your list of manuals |
Page 48 highlights
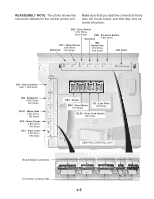
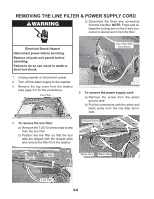
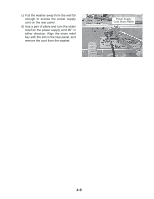
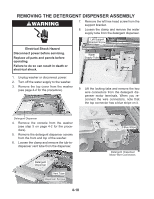
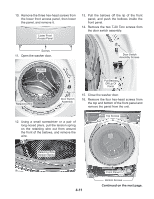
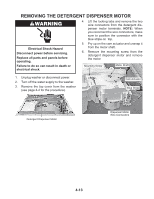
REMOVING THE DETERGENT DISPENSER ASSEMBLY 7. Remove the left hex-head screw from the support bracket. 8. Loosen the clamp and remove the water supply tube from the detergent dispenser. Left Support Bracket Screw Electrical Shock Hazard Disconnect power before servicing. Replace all parts and panels before operating. Failure to do so can result in death or electrical shock. Water Supply Tube 1. Unplug washer or disconnect power. 2. Turn off the water supply to the washer. 3. Remove the top cover from the washer (see page 4-2 for the procedure). 9. Lift the locking tabs and remove the two wire connectors from the detergent dispenser motor terminals. When you reconnect the wire connectors, note that the top connector has a blue stripe on it. Detergent Dispenser 4. Remove the console from the washer (see step 5 on page 4-2 for the procedure). 5. Remove the detergent dispenser screws from the front and top of the washer. 6. Loosen the clamp and remove the tub-todispenser vent tube from the dispenser. Detergent Dispenser Vent Tube Dispenser Screws 4-10 Blue Stripe Detergent Dispenser Motor Wire Connectors
-
 1
1 -
2
-
3
-
4
-
5
-
6
-
7
-
8
-
9
-
10
-
11
-
12
-
13
-
14
-
15
-
16
-
17
-
18
-
19
-
20
-
21
-
22
-
23
-
24
-
25
-
26
-
27
-
28
-
29
-
30
-
31
-
32
-
33
-
34
-
35
-
36
-
37
-
38
-
39
-
40
-
41
-
42
-
 43
43 -
 44
44 -
 45
45 -
 46
46 -
 47
47 -
 48
48 -
 49
49 -
 50
50 -
 51
51 -
 52
52 -
 53
53 -
54
-
55
-
56
-
57
-
58
-
59
-
60
-
61
-
62
-
63
-
64
-
65
-
66
-
67
-
68
-
69
-
70
-
71
-
72
-
73
-
74
-
75
-
76
-
77
-
78
-
79
-
80
-
81
-
82
-
83
-
84
-
85
-
86
-
87
-
88
-
89
-
90
-
91
-
92
-
93
-
94
-
95
-
96
 |
 |
