Kenmore HE2t User Guide - Page 83
Diagnostic Test - washer error codes
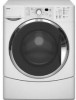 |
View all Kenmore HE2t manuals
Add to My Manuals
Save this manual to your list of manuals |
Page 83 highlights
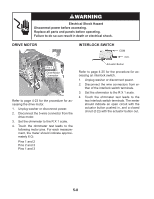
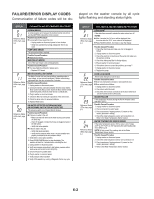
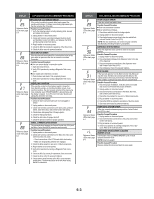
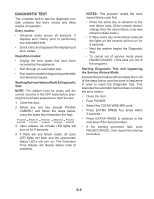
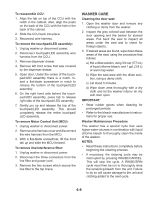
DIAGNOSTIC TEST The complete built-in service diagnostic module contains two entry modes and three modes of operation. Entry modes: • Universal mode across all products. It displays error history prior to performing any automated test. • Quick entry and bypasses the displaying of error codes. Operation modes: • Display the error states that have been recorded by the appliance. • Run through an automated test. • Run loads to assist in diagnosing potentially non-electrical issues. Starting Service History Mode & Diagnostic Test: NOTE: The washer must be empty and the control must be in the OFF state before pressing the touchpad sequence to start the test. 1. Close the door. 2. Select any one key (except PAUSE/ CANCEL) and follow the steps below, using the same key (remember the key): Press/hold Release for Press/hold Release for Press/hold 4 seconds 4 seconds 4 seconds 4 seconds 4 seconds 3. Upon release, all console LED lights will turn on for 5 seconds. 4. If there are any failure codes, all cycle LED lights will flash and the appropriate Status LED's will turn on. The Estimated Time Display will display failure code (if available). NOTES: This program recalls the most recent failure code first. • Press the same key to advance to the next failure code. (If the console doesn't change then the same failure code was stored multiple times.) • If there aren't any more failure codes all the lights on the console will turn on for 5 seconds. • Next the washer begins the Diagnostic Test. • To cancel out of service mode press PAUSE/CANCEL. (This exits you out of the program.) Starting Diagnostic Test and bypassing the Service History Mode: Execute this procedure with an empty drum. All of the steps below must be done in sequence in order to reach the Diagnostic Test. This executes the automatic test but does not show the error history. • Close the door. • Push POWER. • Select the CLEAN WASHER cycle. • Press EXTRA RINSE four times within 5 seconds. • Press EXTRA RINSE to advance to the next step of the test procedure. • If the starting procedure fails, push PAUSE/CANCEL, then repeat the starting procedure. 6-5
-
 1
1 -
2
-
3
-
4
-
5
-
6
-
7
-
8
-
9
-
10
-
11
-
12
-
13
-
14
-
15
-
16
-
17
-
18
-
19
-
20
-
21
-
22
-
23
-
24
-
25
-
26
-
27
-
28
-
29
-
30
-
31
-
32
-
33
-
34
-
35
-
36
-
37
-
38
-
39
-
40
-
41
-
42
-
43
-
44
-
45
-
46
-
47
-
48
-
49
-
50
-
51
-
52
-
53
-
54
-
55
-
56
-
57
-
58
-
59
-
60
-
61
-
62
-
63
-
64
-
65
-
66
-
67
-
68
-
69
-
70
-
71
-
72
-
73
-
74
-
75
-
76
-
77
-
 78
78 -
 79
79 -
 80
80 -
 81
81 -
 82
82 -
 83
83 -
 84
84 -
 85
85 -
 86
86 -
 87
87 -
 88
88 -
89
-
90
-
91
-
92
-
93
-
94
-
95
-
96
 |
 |
