Kodak 8437477 User Guide - Page 23
Menu structure, Start, Menu Title, Quick instruction, option in a row with a white background
 |
UPC - 041778437476
View all Kodak 8437477 manuals
Add to My Manuals
Save this manual to your list of manuals |
Page 23 highlights
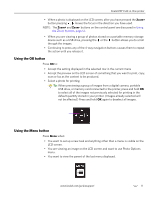
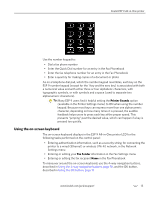
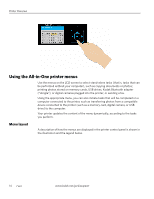
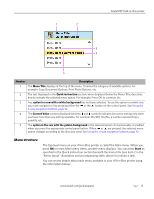
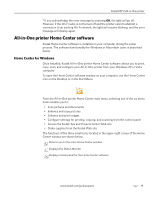
1 2 Kodak ESP 9 All-in-One printer 3 4 5 Number Description 1 The Menu Title displays at the top of the menu. It names the category of available options. For example: Copy Document Options, Print Photo Options, etc. 2 The text displayed in the Quick instruction section, when displayed below the Menu Title, describes how to activate the selected menu option. For example: Press OK to continue, etc. 3 Any option in a row with a white background has not been selected. To use the option in a white row, you must navigate to it by pressing either the or the button on the control panel. See Using the 4-way navigation buttons, page 10. 4 The Current Value content displayed between and symbols indicates the active setting only when you have more than one setting available. For example: On/Off, Yes/No, a number representing a quantity, etc. 5 The option in the row with the golden background is the selected option. Its functionality is enabled when you press the appropriate control panel button. When or are pressed, the selected menu option changes according to the direction used. See Using the 4-way navigation buttons, page 10. Menu structure The top-level menu on your All-in-One printer is called the Main menu. When you press OK on most Main menu items, another menu displays. You can press Start as specified in the Quick instruction section beneath the menu title (see item 2 in the "Menu layout" illustration and accompanying table, above) to initiate a task. You can review details about each menu available in your All-in-One printer using the information below: www.kodak.com/go/aiosupport 15
-
 1
1 -
2
-
3
-
4
-
5
-
6
-
7
-
8
-
9
-
10
-
11
-
12
-
13
-
14
-
15
-
16
-
17
-
 18
18 -
 19
19 -
 20
20 -
 21
21 -
 22
22 -
 23
23 -
 24
24 -
 25
25 -
 26
26 -
 27
27 -
 28
28 -
29
-
30
-
31
-
32
-
33
-
34
-
35
-
36
-
37
-
38
-
39
-
40
-
41
-
42
-
43
-
44
-
45
-
46
-
47
-
48
-
49
-
50
-
51
-
52
-
53
-
54
-
55
-
56
-
57
-
58
-
59
-
60
-
61
-
62
-
63
-
64
-
65
-
66
-
67
-
68
-
69
-
70
-
71
-
72
-
73
-
74
-
75
-
76
-
77
-
78
-
79
-
80
-
81
-
82
-
83
-
84
-
85
-
86
-
87
-
88
-
89
-
90
-
91
-
92
-
93
-
94
-
95
-
96
-
97
-
98
-
99
-
100
-
101
-
102
-
103
-
104
-
105
-
106
-
107
-
108
-
109
-
110
-
111
-
112
-
113
-
114
-
115
-
116
-
117
-
118
-
119
-
120
-
121
-
122
-
123
-
124
-
125
-
126
-
127
-
128
-
129
-
130
-
131
-
132
-
133
-
134
-
135
-
136
-
137
-
138
-
139
-
140
-
141
-
142
-
143
 |
 |
