Kodak ESP9 User Manual - Page 20
Using the 4-way navigation buttons, Preview - updates
 |
UPC - 041771349479
View all Kodak ESP9 manuals
Add to My Manuals
Save this manual to your list of manuals |
Page 20 highlights
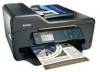
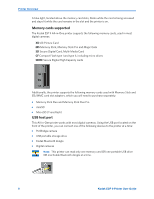
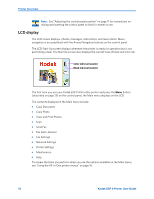
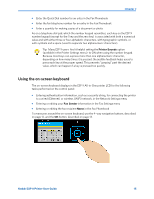
Printer Overview Using the 4-way navigation buttons Note: The OK button is located in the center of the 4-way navigation buttons on the control panel. Its use is described on page 13. The 4-way navigation buttons allow you to update the content displayed on the LCD display. • Pressing highlights the next row down in the visible menu. When the last row in a menu is highlighted, pressing causes the visible page to be replaced with the following page in a multi-page menu, with the top row highlighted; in a one-page menu, this action highlights the top item. • Pressing returns you to the previous page in a multi-page menu. • After you have initiated the process of zooming when a photo is shown on the LCD display, pressing or pans the focus up or down. (See "Using the Zoom buttons" on page 13) Tip: When you have selected a photo or document shown on the LCD display to be printed, pressing or increases or decreases the output quantity. If you have selected more than one item for printing, you can specify a different quantity for each one. The LCD displays the number of copies of each selected item to be printed. Using this feature does not change the number of files stored on your camera or portable USB drive, however. • When there are two or more options for the setting shown on the selected menu row, Preview Yes the current value is displayed between the and symbols. Pressing or on the control panel scrolls through the choices. • When a photo is displayed on the LCD display, after you have pressed the Zoom+ button pressing , moves the focus in the direction you have used. Note: The Zoom+ and Zoom- buttons on the control panel are discussed on page 13. 12 Kodak ESP 9 Printer User Guide
-
 1
1 -
2
-
3
-
4
-
5
-
6
-
7
-
8
-
9
-
10
-
11
-
12
-
13
-
14
-
 15
15 -
 16
16 -
 17
17 -
 18
18 -
 19
19 -
 20
20 -
 21
21 -
 22
22 -
 23
23 -
 24
24 -
 25
25 -
26
-
27
-
28
-
29
-
30
-
31
-
32
-
33
-
34
-
35
-
36
-
37
-
38
-
39
-
40
-
41
-
42
-
43
-
44
-
45
-
46
-
47
-
48
-
49
-
50
-
51
-
52
-
53
-
54
-
55
-
56
-
57
-
58
-
59
-
60
-
61
-
62
-
63
-
64
-
65
-
66
-
67
-
68
-
69
-
70
-
71
-
72
-
73
-
74
-
75
-
76
-
77
-
78
-
79
-
80
-
81
-
82
-
83
-
84
-
85
-
86
-
87
-
88
-
89
-
90
-
91
-
92
-
93
-
94
-
95
-
96
-
97
-
98
-
99
-
100
-
101
-
102
-
103
-
104
-
105
-
106
-
107
-
108
-
109
-
110
-
111
-
112
-
113
-
114
-
115
-
116
-
117
-
118
-
119
-
120
-
121
-
122
-
123
-
124
-
125
-
126
-
127
-
128
-
129
-
130
-
131
-
132
-
133
-
134
-
135
-
136
-
137
-
138
-
139
-
140
-
141
 |
 |