Kodak ESP9 User Manual - Page 78
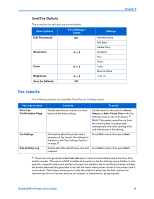
Changing Send Fax settings, Start, Send Fax, Fax Options, Resolution, Color, Brightness
 |
UPC - 041771349479
View all Kodak ESP9 manuals
Add to My Manuals
Save this manual to your list of manuals |
Page 78 highlights
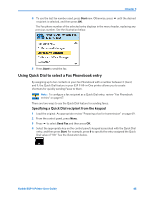
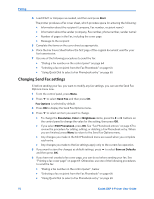
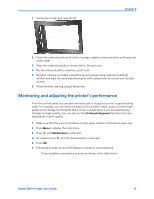
Faxing 4 Load 8.5x11 or A4 paper as needed, and then and press Start. The printer produces a Fax cover sheet, which provides space for entering the following: • Information about the recipient (company, Fax number, recipient name) • Information about the sender (company, Fax number, phone number, sender name) • Number of pages in the Fax, including the cover page • Message to the recipient 5 Complete the items on the cover sheet as appropriate. 6 Place the Fax Cover Sheet before the first page of the original document used for your fax transmission. 7 Use one of the following procedures to send the fax: • "Dialing a fax number on the control panel" on page 64 • "Selecting a fax recipient from the Fax Phonebook" on page 64 • "Using Quick Dial to select a Fax Phonebook entry" on page 65 Changing Send Fax settings If, before sending your fax, you want to modify any fax settings, you can use the Send Fax Options menu now. 1 From the control panel, press Menu. 2 Press to select Send Fax and then press OK. Fax Options is selected by default. 3 Press OK to display the Send Fax Options menu. 4 Press to select an item you want to change. • To change the Resolution, Color or Brightness items, press the or buttons on the control panel to change the value for the setting; then press OK. • If you select Edit Phonebook, press OK. See "Fax Phonebook entries" on page 67 to review the procedure for adding, editing, or deleting a Fax Phonebook entry. When you are finished, press Menu to return to the Send Fax Options menu. • Any changes you make in the Edit Phonebook menu are saved when you complete each entry. • Any changes you make to the fax settings apply only to the current fax operation. 5 If you want to save the changes as default settings, press to select Save as Defaults and then press OK. 6 If you have not created a fax cover page, you can do so before sending your fax. See "Printing a fax cover page" on page 69. Otherwise, use one of the following procedures to send the fax: • "Dialing a fax number on the control panel" , below • "Selecting a fax recipient from the Fax Phonebook" on page 64 • "Using Quick Dial to select a Fax Phonebook entry" on page 65 70 Kodak ESP 9 Printer User Guide
-
 1
1 -
2
-
3
-
4
-
5
-
6
-
7
-
8
-
9
-
10
-
11
-
12
-
13
-
14
-
15
-
16
-
17
-
18
-
19
-
20
-
21
-
22
-
23
-
24
-
25
-
26
-
27
-
28
-
29
-
30
-
31
-
32
-
33
-
34
-
35
-
36
-
37
-
38
-
39
-
40
-
41
-
42
-
43
-
44
-
45
-
46
-
47
-
48
-
49
-
50
-
51
-
52
-
53
-
54
-
55
-
56
-
57
-
58
-
59
-
60
-
61
-
62
-
63
-
64
-
65
-
66
-
67
-
68
-
69
-
70
-
71
-
72
-
 73
73 -
 74
74 -
 75
75 -
 76
76 -
 77
77 -
 78
78 -
 79
79 -
 80
80 -
 81
81 -
 82
82 -
 83
83 -
84
-
85
-
86
-
87
-
88
-
89
-
90
-
91
-
92
-
93
-
94
-
95
-
96
-
97
-
98
-
99
-
100
-
101
-
102
-
103
-
104
-
105
-
106
-
107
-
108
-
109
-
110
-
111
-
112
-
113
-
114
-
115
-
116
-
117
-
118
-
119
-
120
-
121
-
122
-
123
-
124
-
125
-
126
-
127
-
128
-
129
-
130
-
131
-
132
-
133
-
134
-
135
-
136
-
137
-
138
-
139
-
140
-
141
 |
 |