Kodak ESP9 User Manual - Page 76
Adding a new Fax Phonebook entry, Editing an existing Fax Phonebook entry, Send Fax, Fax Options
 |
UPC - 041771349479
View all Kodak ESP9 manuals
Add to My Manuals
Save this manual to your list of manuals |
Page 76 highlights
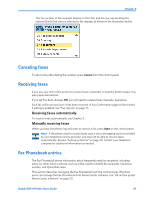
Faxing Adding a new Fax Phonebook entry 1 From the control panel, press Menu. 2 Press to select Send Fax and press OK. Note: This option is also accessible by selecting Edit Phonebook from the Fax Settings menu. 3 Select Fax Options and press OK. 4 Select Edit Phonebook and press OK. The Edit Phonebook menu displays on the LCD. 5 Press to select Add New Entry and press OK. 6 If the fax number field fails to display automatically on the LCD, press OK to select the Number field in the Edit Phonebook Entry menu. The number field is highlighted. 7 Using the keypad on the control panel, enter the fax number in the field displayed on the LCD and then press OK. 8 When you are finished entering the fax phone number, press OK. 9 Press to select Name and press OK. 10 Using the LCD on-screen keyboard, enter a name for the recipient. • Notice the abc/123 key is highlighted. As needed, press OK to display the ABC/123 key. Toggle between these two keys by pressing OK as needed. • Here, press , , or to select a key. Use the BKSP key to erase an incorrect entry. Select the Done key when you are finished, and then press OK. 11 To assign a Quick Dial number to this name, press to select highlight Quick Dial and press OK. 12 Enter a number between 0 and 9 on the keypad on the control panel, and then press OK. 13 Press to select DONE when the entry is complete, and press OK. 14 To continue to add entries to the Fax Phonebook, repeat this procedure. Editing an existing Fax Phonebook entry 1 From the control panel, press Menu. 2 Press to select Send Fax and press OK. Note: This option is also accessible by selecting Edit Phonebook from the Fax Settings menu. 3 Select Fax Options and press OK. 4 Select Edit Phonebook and press OK. The Edit Phonebook menu displays on the LCD. 68 Kodak ESP 9 Printer User Guide
-
 1
1 -
2
-
3
-
4
-
5
-
6
-
7
-
8
-
9
-
10
-
11
-
12
-
13
-
14
-
15
-
16
-
17
-
18
-
19
-
20
-
21
-
22
-
23
-
24
-
25
-
26
-
27
-
28
-
29
-
30
-
31
-
32
-
33
-
34
-
35
-
36
-
37
-
38
-
39
-
40
-
41
-
42
-
43
-
44
-
45
-
46
-
47
-
48
-
49
-
50
-
51
-
52
-
53
-
54
-
55
-
56
-
57
-
58
-
59
-
60
-
61
-
62
-
63
-
64
-
65
-
66
-
67
-
68
-
69
-
70
-
 71
71 -
 72
72 -
 73
73 -
 74
74 -
 75
75 -
 76
76 -
 77
77 -
 78
78 -
 79
79 -
 80
80 -
 81
81 -
82
-
83
-
84
-
85
-
86
-
87
-
88
-
89
-
90
-
91
-
92
-
93
-
94
-
95
-
96
-
97
-
98
-
99
-
100
-
101
-
102
-
103
-
104
-
105
-
106
-
107
-
108
-
109
-
110
-
111
-
112
-
113
-
114
-
115
-
116
-
117
-
118
-
119
-
120
-
121
-
122
-
123
-
124
-
125
-
126
-
127
-
128
-
129
-
130
-
131
-
132
-
133
-
134
-
135
-
136
-
137
-
138
-
139
-
140
-
141
 |
 |
