Kodak ESP9 User Manual - Page 31
Setting Up Your Printer, Selecting a printer location, Configuring printer settings, Configuring - all in one printer reviews
 |
UPC - 041771349479
View all Kodak ESP9 manuals
Add to My Manuals
Save this manual to your list of manuals |
Page 31 highlights
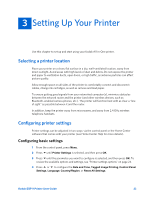
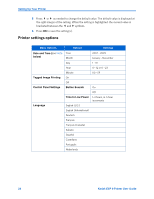
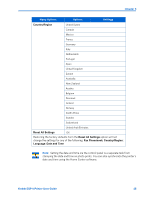
3 Setting Up Your Printer Use this chapter to set up and start using your Kodak All-in-One printer. Selecting a printer location Place your printer on a clean, flat surface in a dry, well-ventilated location, away from direct sunlight. Avoid areas with high levels of dust and debris. Do not expose the printer and paper to ventilation ducts, open doors, or high traffic, as airborne particles can affect picture quality. Allow enough space on all sides of the printer to comfortably connect and disconnect cables, change ink cartridges, as well as remove and load paper. To ensure getting good signals from your networked computer(s), minimize obstacles between the network router and the printer (and other wireless devices, such as Bluetooth-enabled camera phones, etc.). The printer will function best with as clear a "line of sight" as possible between it and the router. In addition, keep the printer away from microwaves, and away from 2.4 GHz wireless telephone handsets. Configuring printer settings Printer settings can be adjusted in two ways: via the control panel or the Home Center software that comes with your printer (see Home Center Help for more details). Configuring basic settings 1 From the control panel, press Menu. 2 Press until Printer Settings is selected, and then press OK. 3 Press until the parameter you want to configure is selected, and then press OK. To review the available options and settings, see "Printer settings options" on page 24. 4 Press or to configure the Date and Time, Tagged Image Printing, Control Panel Settings, Language, Country/Region, or Reset All Settings. Kodak ESP 9 Printer User Guide 23
-
 1
1 -
2
-
3
-
4
-
5
-
6
-
7
-
8
-
9
-
10
-
11
-
12
-
13
-
14
-
15
-
16
-
17
-
18
-
19
-
20
-
21
-
22
-
23
-
24
-
25
-
 26
26 -
 27
27 -
 28
28 -
 29
29 -
 30
30 -
 31
31 -
 32
32 -
 33
33 -
 34
34 -
 35
35 -
 36
36 -
37
-
38
-
39
-
40
-
41
-
42
-
43
-
44
-
45
-
46
-
47
-
48
-
49
-
50
-
51
-
52
-
53
-
54
-
55
-
56
-
57
-
58
-
59
-
60
-
61
-
62
-
63
-
64
-
65
-
66
-
67
-
68
-
69
-
70
-
71
-
72
-
73
-
74
-
75
-
76
-
77
-
78
-
79
-
80
-
81
-
82
-
83
-
84
-
85
-
86
-
87
-
88
-
89
-
90
-
91
-
92
-
93
-
94
-
95
-
96
-
97
-
98
-
99
-
100
-
101
-
102
-
103
-
104
-
105
-
106
-
107
-
108
-
109
-
110
-
111
-
112
-
113
-
114
-
115
-
116
-
117
-
118
-
119
-
120
-
121
-
122
-
123
-
124
-
125
-
126
-
127
-
128
-
129
-
130
-
131
-
132
-
133
-
134
-
135
-
136
-
137
-
138
-
139
-
140
-
141
 |
 |