Kodak ESP9 User Manual - Page 79
Send Fax Options, Fax reports - all in one fax lost job
 |
UPC - 041771349479
View all Kodak ESP9 manuals
Add to My Manuals
Save this manual to your list of manuals |
Page 79 highlights
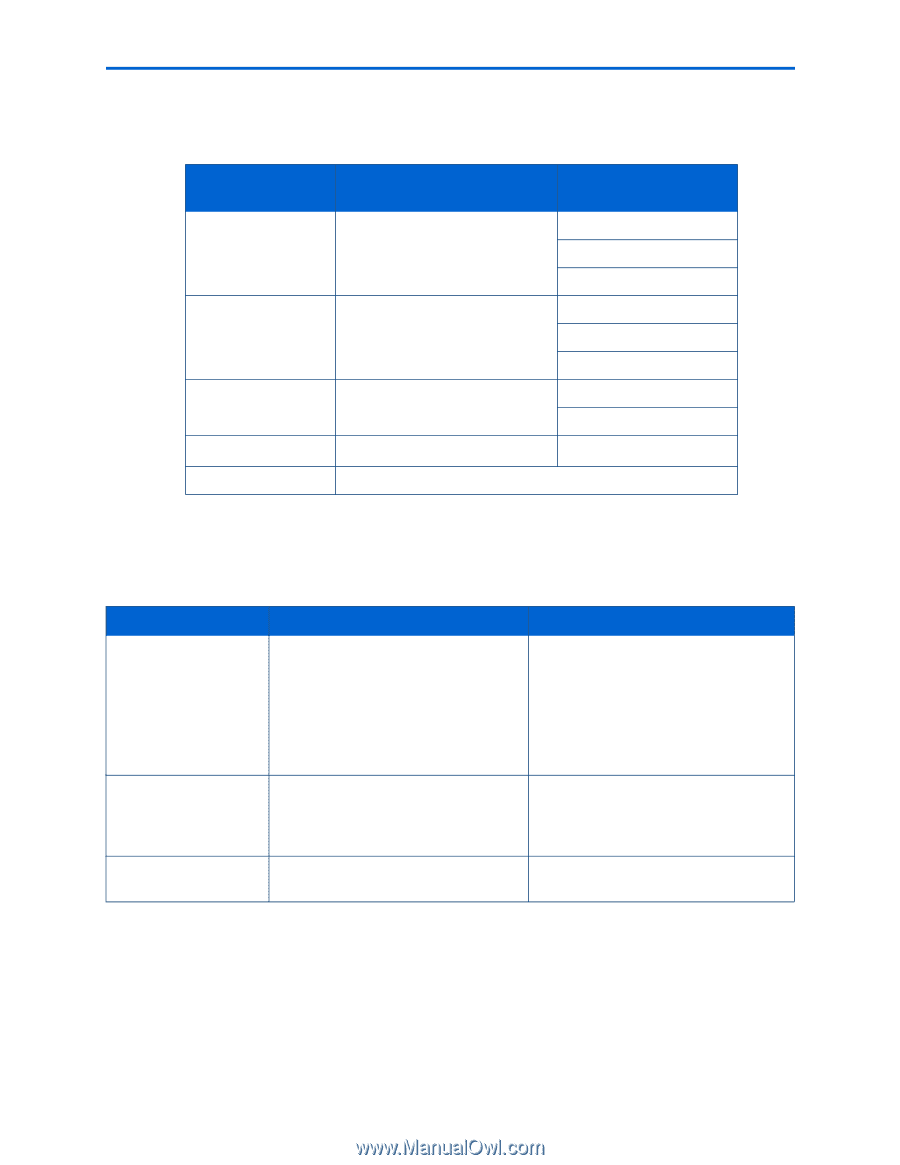
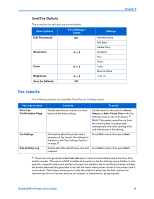
Send Fax Options The available fax settings are shown below: Menu Options View Settings / Select Edit Phonebook OK Resolution or Color or Brightness or Save As Defaults OK Chapter 8 Settings Add New Entry Edit Entry Delete Entry Standard Fine Photo Color Black & White -3 to +3 Fax reports The following reports are available from the Fax Settings menu: Fax report name Print Fax Confirmation Page Fax Settings Fax Activity Log Contains: To print: Details about faxes, one fax at a time, based on the menu setting. Set the value for this option to Never, Always, or After Failure Only in the Fax Settings menu on the LCD display. Note: This report cannot be run from the control panel; it is generated automatically only after sending a fax, and only based on the setting. Information about the printer and a summary of the current fax settings for the device. See "Fax Settings Options " on page 37. Press OK to select, then press Start. Details about the last 30 faxes sent and Press OK to select, then press Start. received. The printer also generates a Fax Lost Job report, which contains details about the time, date, and fax number. This option is NOT available as an option in the Fax Settings menu. Rather, if a fax was not received because your printer lost power (for instance, due to an electrical power outage), the printer automatically generates a Fax Lost Job report when power returns to the printer (and it is turned on). This feature allows you to notify the sender(s) about any fax that could not be received due to loss of power, and you can request re-transmission, as appropriate. Kodak ESP 9 Printer User Guide 71
-
 1
1 -
2
-
3
-
4
-
5
-
6
-
7
-
8
-
9
-
10
-
11
-
12
-
13
-
14
-
15
-
16
-
17
-
18
-
19
-
20
-
21
-
22
-
23
-
24
-
25
-
26
-
27
-
28
-
29
-
30
-
31
-
32
-
33
-
34
-
35
-
36
-
37
-
38
-
39
-
40
-
41
-
42
-
43
-
44
-
45
-
46
-
47
-
48
-
49
-
50
-
51
-
52
-
53
-
54
-
55
-
56
-
57
-
58
-
59
-
60
-
61
-
62
-
63
-
64
-
65
-
66
-
67
-
68
-
69
-
70
-
71
-
72
-
73
-
 74
74 -
 75
75 -
 76
76 -
 77
77 -
 78
78 -
 79
79 -
 80
80 -
 81
81 -
 82
82 -
 83
83 -
 84
84 -
85
-
86
-
87
-
88
-
89
-
90
-
91
-
92
-
93
-
94
-
95
-
96
-
97
-
98
-
99
-
100
-
101
-
102
-
103
-
104
-
105
-
106
-
107
-
108
-
109
-
110
-
111
-
112
-
113
-
114
-
115
-
116
-
117
-
118
-
119
-
120
-
121
-
122
-
123
-
124
-
125
-
126
-
127
-
128
-
129
-
130
-
131
-
132
-
133
-
134
-
135
-
136
-
137
-
138
-
139
-
140
-
141
 |
 |