Kodak ESP9 User Manual - Page 35
Configuring basic wireless (WiFi) settings, Network Settings options, WiFi Setup Wizard - all in one printer review
 |
UPC - 041771349479
View all Kodak ESP9 manuals
Add to My Manuals
Save this manual to your list of manuals |
Page 35 highlights
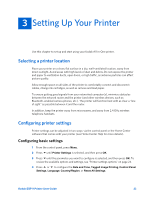
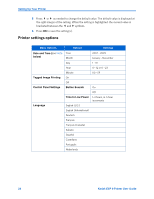
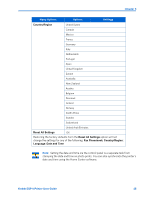
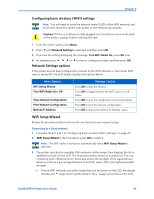
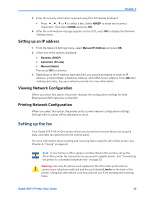
Chapter 3 Configuring basic wireless (WiFi) settings Note: You will need to know the network name (SSID) of the WiFi network, and its security string to connect your printer to the network successfully. Caution: If there is an Ethernet cable plugged in to the Ethernet port on the back of the printer, unplug it before starting this task. 1 From the control panel, press Menu. 2 Press until Network Settings is selected, and then press OK. 3 If you see the setting displaying the message: Turn WiFi Radio On, press OK now. 4 As needed, press , , or to view or configure an item, and then press OK. Network Settings options If the printer has not been configured to connect to the WiFi network or the printer WiFi radio is turned off, the LCD display displays the options below: Menu Options WiFi Setup Wizard Turn WiFi Radio On / Off View Network Configuration Print Network Configuration Manual IP Address Settings / Action Press OK to start the Wizard. Press OK to toggle between the WiFi radio on or off states. Press OK to view the configuration on the LCD display. Press OK to print the network configuration. Press OK to display the Manual IP Address menu. WiFi Setup Wizard Review the procedures below and use the one that suits your network setup. Connecting to a listed network 1 Complete Steps 1 and 2 of "Configuring basic wireless (WiFi) settings" on page 27. 2 WiFi Setup Wizard is the first option; press OK to select it. Note: The WiFi radio is turned on automatically when WiFi Setup Wizard is selected. 3 The printer searches for available WiFi networks within range; then displays the list in alphabetical order on the LCD. The illustration below shows an example list. The row containing each listed also shows the strength of the signal (shown below as xx%) as a percentage between 0 and 100, where 100 is the highest possible strength. • If more WiFi networks are within range than can be shown on the LCD, the display includes the (page down) symbol and/or the (page up) symbol on the LCD. Kodak ESP 9 Printer User Guide 27
-
 1
1 -
2
-
3
-
4
-
5
-
6
-
7
-
8
-
9
-
10
-
11
-
12
-
13
-
14
-
15
-
16
-
17
-
18
-
19
-
20
-
21
-
22
-
23
-
24
-
25
-
26
-
27
-
28
-
29
-
 30
30 -
 31
31 -
 32
32 -
 33
33 -
 34
34 -
 35
35 -
 36
36 -
 37
37 -
 38
38 -
 39
39 -
 40
40 -
41
-
42
-
43
-
44
-
45
-
46
-
47
-
48
-
49
-
50
-
51
-
52
-
53
-
54
-
55
-
56
-
57
-
58
-
59
-
60
-
61
-
62
-
63
-
64
-
65
-
66
-
67
-
68
-
69
-
70
-
71
-
72
-
73
-
74
-
75
-
76
-
77
-
78
-
79
-
80
-
81
-
82
-
83
-
84
-
85
-
86
-
87
-
88
-
89
-
90
-
91
-
92
-
93
-
94
-
95
-
96
-
97
-
98
-
99
-
100
-
101
-
102
-
103
-
104
-
105
-
106
-
107
-
108
-
109
-
110
-
111
-
112
-
113
-
114
-
115
-
116
-
117
-
118
-
119
-
120
-
121
-
122
-
123
-
124
-
125
-
126
-
127
-
128
-
129
-
130
-
131
-
132
-
133
-
134
-
135
-
136
-
137
-
138
-
139
-
140
-
141
 |
 |