Konica Minolta bizhub 42 bizhub 36/42 Print Operations User Guide - Page 103
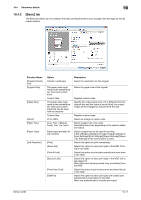
Editing watermark
 |
View all Konica Minolta bizhub 42 manuals
Add to My Manuals
Save this manual to your list of manuals |
Page 103 highlights
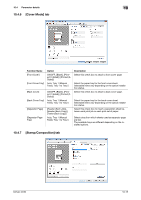
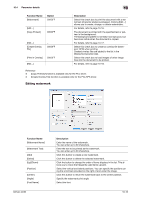
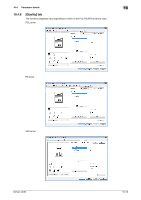
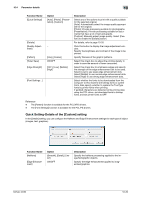
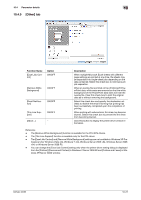
10.4 Parameter details 10 Function Name [Watermark] Option ON/OFF [Edit...] [Copy Protect] − ON/OFF [Edit...] [Create Overlay File] − ON/OFF [Print in Overlay] ON/OFF [Edit...] − Description Select this check box to print the document with a watermark (character stamp) overlapped. Clicking [Edit...] allows you to create, change, or delete watermarks. For details, refer to page 10-16. The document is printed with the specified text or pattern in the background. The background pattern is normally inconspicuous, but becomes visible when the document is copied. For details, refer to page 10-17. Select this check box to create an overlay file (extension: KFO) when printing. Created overlay files are added to the list in the [Stamp/Composition] tab. Select this check box to load images of other image files into the document to be printed. For details, refer to page 10-18. Reference - [Copy Protect] function is available only for the PCL driver. - [Create Overlay File] function is available only for the PCL/XPS driver. Editing watermark Function Name [Watermark Name] [Watermark Text] [Add] [Delete] [Up]/[Down] [Position] [Center] [Angle] [Font Name] bizhub 42/36 Description Enter the name of the watermark. You can enter up to 30 characters. Enter the text to be printed as the watermark. You can enter up to 30 characters. Click this button to create a new watermark. Click this button to delete the selected watermark. Click the button to change the order of items displays in the list. This allows you to move the frequently used items upward. Select the vertical and lateral positions. You can specify the positions using the scroll bars provided on the right of and under the image. Click this button to return the watermark back to the center position. Specify the watermark print angle. Select the font. 10-16
-
 1
1 -
2
-
3
-
4
-
5
-
6
-
7
-
8
-
9
-
10
-
11
-
12
-
13
-
14
-
15
-
16
-
17
-
18
-
19
-
20
-
21
-
22
-
23
-
24
-
25
-
26
-
27
-
28
-
29
-
30
-
31
-
32
-
33
-
34
-
35
-
36
-
37
-
38
-
39
-
40
-
41
-
42
-
43
-
44
-
45
-
46
-
47
-
48
-
49
-
50
-
51
-
52
-
53
-
54
-
55
-
56
-
57
-
58
-
59
-
60
-
61
-
62
-
63
-
64
-
65
-
66
-
67
-
68
-
69
-
70
-
71
-
72
-
73
-
74
-
75
-
76
-
77
-
78
-
79
-
80
-
81
-
82
-
83
-
84
-
85
-
86
-
87
-
88
-
89
-
90
-
91
-
92
-
93
-
94
-
95
-
96
-
97
-
 98
98 -
 99
99 -
 100
100 -
 101
101 -
 102
102 -
 103
103 -
 104
104 -
 105
105 -
 106
106 -
 107
107 -
 108
108 -
109
-
110
-
111
-
112
-
113
-
114
-
115
-
116
-
117
-
118
-
119
-
120
-
121
-
122
-
123
-
124
-
125
-
126
-
127
-
128
-
129
-
130
-
131
-
132
-
133
-
134
-
135
-
136
-
137
-
138
-
139
-
140
-
141
-
142
-
143
-
144
-
145
-
146
-
147
-
148
-
149
-
150
-
151
-
152
-
153
-
154
-
155
-
156
-
157
-
158
-
159
-
160
-
161
-
162
-
163
-
164
-
165
-
166
-
167
-
168
-
169
-
170
-
171
-
172
-
173
-
174
-
175
-
176
-
177
-
178
-
179
-
180
-
181
-
182
-
183
-
184
-
185
-
186
-
187
-
188
-
189
-
190
-
191
-
192
-
193
-
194
-
195
-
196
-
197
-
198
 |
 |