Konica Minolta bizhub 42 bizhub 36/42 Print Operations User Guide - Page 64
Selecting and connecting a printer, geScope Web Connection
 |
View all Konica Minolta bizhub 42 manuals
Add to My Manuals
Save this manual to your list of manuals |
Page 64 highlights
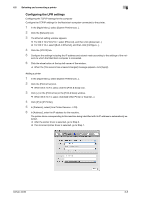
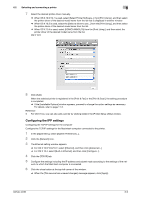
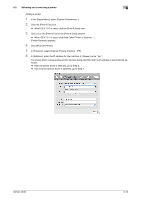
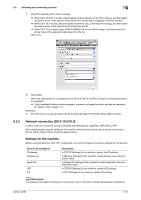
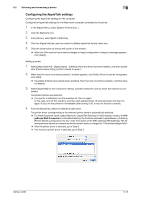
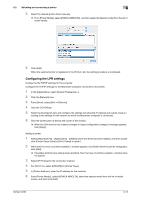
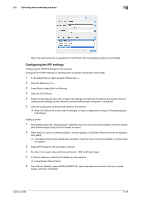
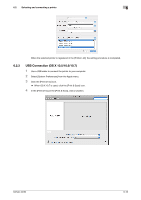
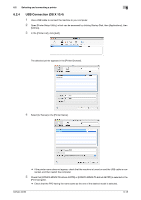
6.2 Selecting and connecting a printer 6 Configuring the AppleTalk settings Configuring the AppleTalk settings for the computer Configure the AppleTalk settings for the Macintosh computer connected to the printer. 1 In the [Apple Menu], select [System Preferences...]. 2 Click the [Network] icon. 3 From [Show:], select [Built-in Ethernet]. 4 Click the [AppleTalk] tab, and then select the [Make AppleTalk Active] check box. 5 Click the close button at the top left corner of the window. % When the [This service has unsaved changes or Apply configuration changes ] message appears, click [Apply]. Adding a printer 1 Select [Macintosh HD] - [Applications] - [Utilities] where the driver has been installed, and then double- click [Printer Setup Utility] or [Print Center] to open it. 2 When the [You have no printers available. ] window appears, click [Add]. When the printer list appears, click [Add]. % If available printers have already been specified, the [You have no printers available. ] window does not appear. 3 Select [AppleTalk] for the connection method, and then select the zone to which the machine is con- nected. Connected printers are detected. % If no printer is detected, turn this machine off, then on again. In this case, turn off this machine, and then wait approximately 10 seconds before turning it on again. If you turn the printer on immediately after turning it off, it may not function correctly. 4 From the [Name] list, select the desired model name. The printer driver corresponding to the selected printer name is automatically selected. % To check the printer name, select [Network] - [AppleTalk Settings] in Administrator mode of the Pa- geScope Web Connection. In the default setting, the contents enclosed in parentheses ( ) following [Printer Name] correspond to the low-order three bytes of the MAC address (HW Address). The following window shows an example where the printer name is changed to "Printer Name(AppleTalk)". % After the printer driver is selected, go to Step 6. % If an incorrect printer driver is selected, go to Step 5. bizhub 42/36 6-13
-
 1
1 -
2
-
3
-
4
-
5
-
6
-
7
-
8
-
9
-
10
-
11
-
12
-
13
-
14
-
15
-
16
-
17
-
18
-
19
-
20
-
21
-
22
-
23
-
24
-
25
-
26
-
27
-
28
-
29
-
30
-
31
-
32
-
33
-
34
-
35
-
36
-
37
-
38
-
39
-
40
-
41
-
42
-
43
-
44
-
45
-
46
-
47
-
48
-
49
-
50
-
51
-
52
-
53
-
54
-
55
-
56
-
57
-
58
-
 59
59 -
 60
60 -
 61
61 -
 62
62 -
 63
63 -
 64
64 -
 65
65 -
 66
66 -
 67
67 -
 68
68 -
 69
69 -
70
-
71
-
72
-
73
-
74
-
75
-
76
-
77
-
78
-
79
-
80
-
81
-
82
-
83
-
84
-
85
-
86
-
87
-
88
-
89
-
90
-
91
-
92
-
93
-
94
-
95
-
96
-
97
-
98
-
99
-
100
-
101
-
102
-
103
-
104
-
105
-
106
-
107
-
108
-
109
-
110
-
111
-
112
-
113
-
114
-
115
-
116
-
117
-
118
-
119
-
120
-
121
-
122
-
123
-
124
-
125
-
126
-
127
-
128
-
129
-
130
-
131
-
132
-
133
-
134
-
135
-
136
-
137
-
138
-
139
-
140
-
141
-
142
-
143
-
144
-
145
-
146
-
147
-
148
-
149
-
150
-
151
-
152
-
153
-
154
-
155
-
156
-
157
-
158
-
159
-
160
-
161
-
162
-
163
-
164
-
165
-
166
-
167
-
168
-
169
-
170
-
171
-
172
-
173
-
174
-
175
-
176
-
177
-
178
-
179
-
180
-
181
-
182
-
183
-
184
-
185
-
186
-
187
-
188
-
189
-
190
-
191
-
192
-
193
-
194
-
195
-
196
-
197
-
198
 |
 |
