Kyocera ECOSYS P2040dw ECOSYS M2635dw/M2040dn/M2540dw/M2640idw/P2040dw/P2235dw - Page 10
Custom Install, Installing with Custom Install
 |
View all Kyocera ECOSYS P2040dw manuals
Add to My Manuals
Save this manual to your list of manuals |
Page 10 highlights
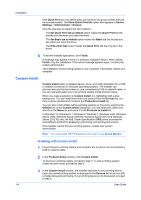
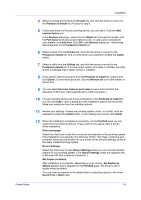
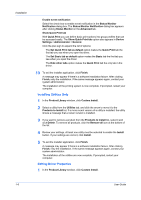
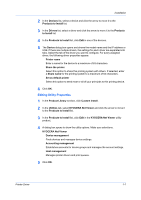
Installation With Quick Print you can define basic print options into group profiles that can be accessed easily. The Show Quick Print tab option also appears in Device Settings > Administrator > General. Click the plus sign to expand the list of options: The Set Quick Print tab as default option makes the Quick Print tab the first tab you see when you open the driver. The Set Basic tab as default option makes the Basic tab the first tab you see when you open the driver. The Hide other tabs option makes the Quick Print tab the only tab in the driver. 8 To exit the installer application, click Finish. A message may appear if there is a software installation failure. After clicking Finish, retry the installation. If the same message appears again, contact your system administrator. The installation of the printing system is now complete. If prompted, restart your computer. Custom Install Custom Install refers to detailed device, driver, and utility installation for a USB or network connection in Windows operating systems. The installer can discover devices that are turned on, and connected by USB or network cable, or you can manually select your own printing system model and port name. When you make a selection in Custom Install, it is highlighted with a blue background. You can install more than one product from the Devices list, but they must be selected and moved to the Products to Install list. You can also install utilities without printing systems or drivers by selecting the Utilities tab on the Custom Install dialog box. You can select the utilities you want from the Name list and move it to the Products to Install list. In Windows 10, Windows 8.1, Windows 8, Windows 7, Windows Vista, Windows Server 2008, Windows Server 2008 R2, Windows Server 2012 and Windows Server 2012 R2 only, the XML Paper Specification (XPS) driver provides the most efficient method for displaying, processing, and printing documents. If the installer cannot find your printing system, contact your system administrator. Note: You must install .NET Framework 4.0 or later to use Status Monitor. Installing with Custom Install 1 Ensure that your printing system and computer are turned on and connected by USB or network cable. 2 In the Product Library window, click Custom Install. To discover a printing system, proceed to step 3. To add a printing system model and port name, proceed to step 5. 3 In the Custom Install window, the installer searches for your printing device. Each discovered printing system is displayed in the Devices list as an icon with a model name and port name. If your printing device is not discovered, proceed to step 5. 1-4 User Guide
-
 1
1 -
2
-
3
-
4
-
 5
5 -
 6
6 -
 7
7 -
 8
8 -
 9
9 -
 10
10 -
 11
11 -
 12
12 -
 13
13 -
 14
14 -
 15
15 -
16
-
17
-
18
-
19
-
20
-
21
-
22
-
23
-
24
-
25
-
26
-
27
-
28
-
29
-
30
-
31
-
32
-
33
-
34
-
35
-
36
-
37
-
38
-
39
-
40
-
41
-
42
-
43
-
44
-
45
-
46
-
47
-
48
-
49
-
50
-
51
-
52
-
53
-
54
-
55
-
56
-
57
-
58
-
59
-
60
-
61
-
62
-
63
-
64
-
65
-
66
-
67
-
68
-
69
-
70
-
71
-
72
-
73
-
74
-
75
-
76
-
77
-
78
-
79
-
80
-
81
-
82
-
83
-
84
-
85
-
86
-
87
-
88
-
89
-
90
-
91
-
92
-
93
 |
 |
