Kyocera KM-2030 Printing System (K) Instruction Handbook (Setup Edition) - Page 98
Custom Paper Size dialog box
 |
View all Kyocera KM-2030 manuals
Add to My Manuals
Save this manual to your list of manuals |
Page 98 highlights
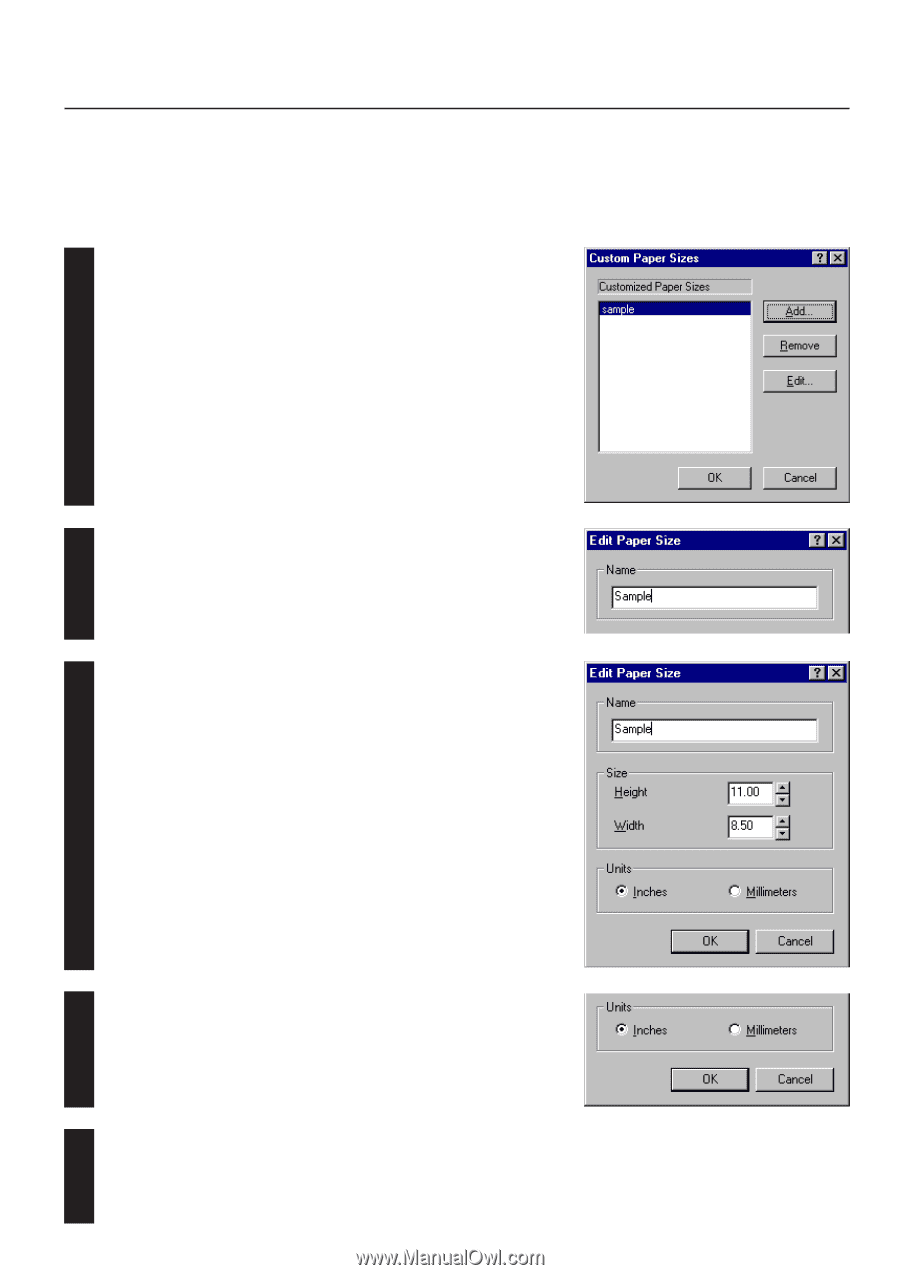
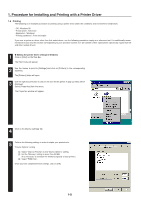
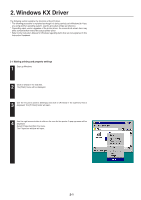
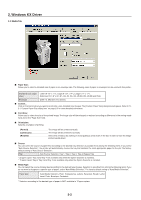
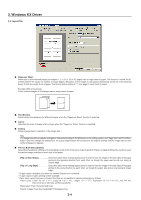
2. Windows KX Driver 2-2-1 Custom Paper Size dialog box I Setting a custom paper size Perform the following procedure in order to register a custom size when you want to print onto a non-standard size of paper. The information registered here will be displayed under the "Page Size" setting in the Media Tab as well as in the Paper Size setting of your application. If you want to register a new custom paper size, click on the "Add" button. The "Edit Paper Size" dialog box will appear. 1 If you want to change a previously registered paper size, click on the registered size to select it and then click on the "Edit" button. If you want to delete a registered paper size, click on the desired size to select it and then click on the "Remove" button. Type into the "Name" field the name you want to use for this custom size of paper. * It is the name that you register here that will actually be displayed under the "Page 2 Size" setting. Select the desired unit of measurement in the "Units" block and the desired dimensions of the paper in the "Size" block. 3 Units: "Inches" or "Millimeters" Height: 5.83 - 17.00 [Inches] 148.1 - 431.8 [Millimeters] Width: 3.88 - 11.69 [Inches] 98.5 - 297.0 [Millimeters] 4 Click on the "OK" button.The "Custom Paper Sizes" dialog box will appear once again. Click on the "OK" button. 5 2-3
-
 1
1 -
2
-
3
-
4
-
5
-
6
-
7
-
8
-
9
-
10
-
11
-
12
-
13
-
14
-
15
-
16
-
17
-
18
-
19
-
20
-
21
-
22
-
23
-
24
-
25
-
26
-
27
-
28
-
29
-
30
-
31
-
32
-
33
-
34
-
35
-
36
-
37
-
38
-
39
-
40
-
41
-
42
-
43
-
44
-
45
-
46
-
47
-
48
-
49
-
50
-
51
-
52
-
53
-
54
-
55
-
56
-
57
-
58
-
59
-
60
-
61
-
62
-
63
-
64
-
65
-
66
-
67
-
68
-
69
-
70
-
71
-
72
-
73
-
74
-
75
-
76
-
77
-
78
-
79
-
80
-
81
-
82
-
83
-
84
-
85
-
86
-
87
-
88
-
89
-
90
-
91
-
92
-
 93
93 -
 94
94 -
 95
95 -
 96
96 -
 97
97 -
 98
98 -
 99
99 -
 100
100 -
 101
101 -
 102
102 -
 103
103 -
104
-
105
-
106
-
107
-
108
-
109
-
110
-
111
-
112
-
113
-
114
-
115
 |
 |