Lenovo NetVista Hardware Maintenance Manual (HMM) for NetVista 6832 and 6833 s - Page 82
in the Configuration/Setup Utility. See Hard Disk, Enter Configuration/Setup Utility and load default
 |
View all Lenovo NetVista manuals
Add to My Manuals
Save this manual to your list of manuals |
Page 82 highlights
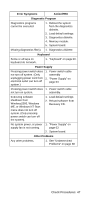
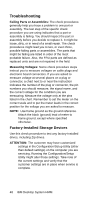
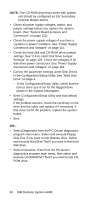
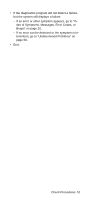
NOTE: The CD-ROM drive that comes with system unit should be configured as IDE Secondary Channel Master device. • Check all power supply voltages, switch, and jumper settings before you replace the system board. (See "System Board Jumpers and Connectors" on page 113) • Check the power supply voltages if you have a "system no-power" condition. See "Power Supply Connectors and Voltages" on page 115. • Check the hard disk and CD-ROM drives jumper settings. See "3.5-In. Hard Disk Drive Jumper Settings" on page 125. Check the voltages of all disk drive power connectors. See "Power Supply Connectors and Voltages" on page 115. • Correct the parameter settings under Disk Drives in the Configuration/Setup Utility. See "Hard Disk Drive" on page 4. - In the Configuration/Setup Utility, check that the correct drive size is set for the flagged drive shown in the System Information. • Enter Configuration/Setup Utility and load default settings. If the problem remains, check the continuity on the drive and the cable and replace it if necessary. If that does not fix the problem, replace the system board. • End. 005 • Select Diagnostics from the PC-Doctor diagnostics program main menu. Select and execute Floppy Disk Test if you want to test diskette drive. Select and execute Hard Disk Test if you want to test hard disk drive. • Select Interactive Tests from the PC-Doctor diagnostics program main menu, then select and execute CD-ROM/DVD Test if you want to test CDROM drive. 50 IBM Desktop System HMM
-
 1
1 -
2
-
3
-
4
-
5
-
6
-
7
-
8
-
9
-
10
-
11
-
12
-
13
-
14
-
15
-
16
-
17
-
18
-
19
-
20
-
21
-
22
-
23
-
24
-
25
-
26
-
27
-
28
-
29
-
30
-
31
-
32
-
33
-
34
-
35
-
36
-
37
-
38
-
39
-
40
-
41
-
42
-
43
-
44
-
45
-
46
-
47
-
48
-
49
-
50
-
51
-
52
-
53
-
54
-
55
-
56
-
57
-
58
-
59
-
60
-
61
-
62
-
63
-
64
-
65
-
66
-
67
-
68
-
69
-
70
-
71
-
72
-
73
-
74
-
75
-
76
-
 77
77 -
 78
78 -
 79
79 -
 80
80 -
 81
81 -
 82
82 -
 83
83 -
 84
84 -
 85
85 -
 86
86 -
 87
87 -
88
-
89
-
90
-
91
-
92
-
93
-
94
-
95
-
96
-
97
-
98
-
99
-
100
-
101
-
102
-
103
-
104
-
105
-
106
-
107
-
108
-
109
-
110
-
111
-
112
-
113
-
114
-
115
-
116
-
117
-
118
-
119
-
120
-
121
-
122
-
123
-
124
-
125
-
126
-
127
-
128
-
129
-
130
-
131
-
132
-
133
-
134
-
135
-
136
-
137
-
138
-
139
-
140
-
141
-
142
-
143
-
144
-
145
-
146
-
147
-
148
-
149
-
150
-
151
-
152
-
153
-
154
-
155
-
156
-
157
-
158
-
159
-
160
-
161
-
162
-
163
-
164
-
165
-
166
-
167
-
168
-
169
-
170
-
171
-
172
-
173
-
174
-
175
-
176
-
177
-
178
-
179
-
180
-
181
-
182
-
183
-
184
-
185
-
186
-
187
-
188
-
189
-
190
-
191
-
192
-
193
-
194
-
195
-
196
-
197
-
198
-
199
-
200
-
201
-
202
-
203
-
204
-
205
-
206
-
207
-
208
-
209
-
210
-
211
 |
 |