Lenovo ThinkStation P900 (English) User Guide - ThinkStation P900 (type 30A4 a - Page 117
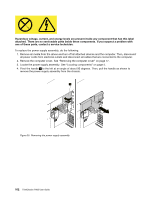
Remove all media from the drives and turn off all attached devices and the computer. Then, disconnect
 |
View all Lenovo ThinkStation P900 manuals
Add to My Manuals
Save this manual to your list of manuals |
Page 117 highlights
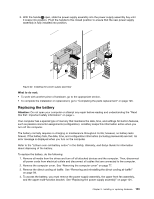
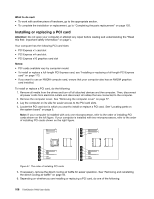
1. Remove all media from the drives and turn off all attached devices and the computer. Then, disconnect all power cords from electrical outlets and disconnect all cables that are connected to the computer. 2. Remove the computer cover. See "Removing the computer cover" on page 77. 3. Lay the computer on its side for easier access to the flex adapter slots. 4. Locate the flex adapter slot in which you want to install or replace a flex adapter. See "Locating parts on the system board" on page 5. Note: If your computer is installed with only one microprocessor, ensure you install a flex adapter into the flex adapter slot 1. If your computer is installed with two microprocessors, ensure you install flex adapters into the flex adapter slot 1 first, and then the flex adapter slot 2. 5. Depending on whether you are installing or replacing a flex adapter, do one of the following: • If you are installing a flex adapter, pivot the tab 1 upward to open the latch 2 inside the multi-function bracket. 1 2 Figure 43. Opening the card latch Chapter 9. Installing or replacing hardware 105
-
 1
1 -
2
-
3
-
4
-
5
-
6
-
7
-
8
-
9
-
10
-
11
-
12
-
13
-
14
-
15
-
16
-
17
-
18
-
19
-
20
-
21
-
22
-
23
-
24
-
25
-
26
-
27
-
28
-
29
-
30
-
31
-
32
-
33
-
34
-
35
-
36
-
37
-
38
-
39
-
40
-
41
-
42
-
43
-
44
-
45
-
46
-
47
-
48
-
49
-
50
-
51
-
52
-
53
-
54
-
55
-
56
-
57
-
58
-
59
-
60
-
61
-
62
-
63
-
64
-
65
-
66
-
67
-
68
-
69
-
70
-
71
-
72
-
73
-
74
-
75
-
76
-
77
-
78
-
79
-
80
-
81
-
82
-
83
-
84
-
85
-
86
-
87
-
88
-
89
-
90
-
91
-
92
-
93
-
94
-
95
-
96
-
97
-
98
-
99
-
100
-
101
-
102
-
103
-
104
-
105
-
106
-
107
-
108
-
109
-
110
-
111
-
 112
112 -
 113
113 -
 114
114 -
 115
115 -
 116
116 -
 117
117 -
 118
118 -
 119
119 -
 120
120 -
 121
121 -
 122
122 -
123
-
124
-
125
-
126
-
127
-
128
-
129
-
130
-
131
-
132
-
133
-
134
-
135
-
136
-
137
-
138
-
139
-
140
-
141
-
142
-
143
-
144
-
145
-
146
-
147
-
148
-
149
-
150
-
151
-
152
-
153
-
154
-
155
-
156
-
157
-
158
-
159
-
160
-
161
-
162
-
163
-
164
 |
 |
