Lenovo ThinkStation P900 (English) User Guide - ThinkStation P900 (type 30A4 a - Page 95
Install the new storage drive into the storage drive bracket. See step 6
 |
View all Lenovo ThinkStation P900 manuals
Add to My Manuals
Save this manual to your list of manuals |
Page 95 highlights
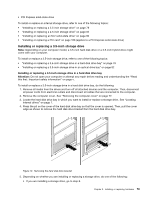
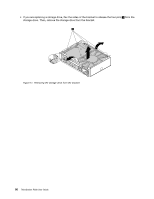
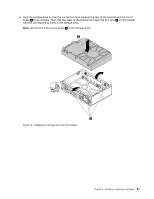
b. Press the tab 1 as shown to open the cover of the front-access storage enclosure. 1 Figure 14. Opening the cover of the front-access storage enclosure c. Open the handles on both sides of the hard disk drive bracket. Then, pull the bracket out of the front-access storage enclosure. • If you are replacing a storage drive, do the following: a. Remove the front-access storage enclosure from the optical drive bay. See "Removing and installing a device in an optical drive bay" on page 96. b. Press the tab 1 as shown to open the cover of the front-access storage enclosure. 1 Figure 15. Opening the cover of the front-access storage enclosure c. Open the handles on both sides of the hard disk drive bracket. Then, pull the bracket with the storage drive out of the front-access storage enclosure. d. Remove the storage drive from the bracket. See step 5 on page 79. 6. Install the new storage drive into the storage drive bracket. See step 6 on page 81. 7. Note the orientation of the connector on the storage drive and you might need to turn over the bracket. Then, slide the bracket with the new storage drive into the front-access storage enclosure until it snaps into position. Chapter 9. Installing or replacing hardware 83
-
 1
1 -
2
-
3
-
4
-
5
-
6
-
7
-
8
-
9
-
10
-
11
-
12
-
13
-
14
-
15
-
16
-
17
-
18
-
19
-
20
-
21
-
22
-
23
-
24
-
25
-
26
-
27
-
28
-
29
-
30
-
31
-
32
-
33
-
34
-
35
-
36
-
37
-
38
-
39
-
40
-
41
-
42
-
43
-
44
-
45
-
46
-
47
-
48
-
49
-
50
-
51
-
52
-
53
-
54
-
55
-
56
-
57
-
58
-
59
-
60
-
61
-
62
-
63
-
64
-
65
-
66
-
67
-
68
-
69
-
70
-
71
-
72
-
73
-
74
-
75
-
76
-
77
-
78
-
79
-
80
-
81
-
82
-
83
-
84
-
85
-
86
-
87
-
88
-
89
-
 90
90 -
 91
91 -
 92
92 -
 93
93 -
 94
94 -
 95
95 -
 96
96 -
 97
97 -
 98
98 -
 99
99 -
 100
100 -
101
-
102
-
103
-
104
-
105
-
106
-
107
-
108
-
109
-
110
-
111
-
112
-
113
-
114
-
115
-
116
-
117
-
118
-
119
-
120
-
121
-
122
-
123
-
124
-
125
-
126
-
127
-
128
-
129
-
130
-
131
-
132
-
133
-
134
-
135
-
136
-
137
-
138
-
139
-
140
-
141
-
142
-
143
-
144
-
145
-
146
-
147
-
148
-
149
-
150
-
151
-
152
-
153
-
154
-
155
-
156
-
157
-
158
-
159
-
160
-
161
-
162
-
163
-
164
 |
 |
