Lenovo ThinkStation P900 (English) User Guide - ThinkStation P900 (type 30A4 a - Page 134
computer and wait several minutes until the computer is cool.
 |
View all Lenovo ThinkStation P900 manuals
Add to My Manuals
Save this manual to your list of manuals |
Page 134 highlights
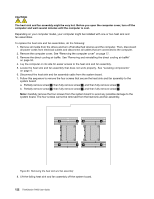
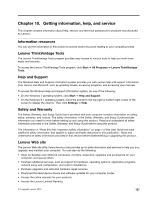
CAUTION: The heat sink and fan assembly might be very hot. Before you open the computer cover, turn off the computer and wait several minutes until the computer is cool. Depending on your computer model, your computer might be installed with one or two heat sink and fan assemblies. To replace the heat sink and fan assemblies, do the following: 1. Remove all media from the drives and turn off all attached devices and the computer. Then, disconnect all power cords from electrical outlets and disconnect all cables that are connected to the computer. 2. Remove the computer cover. See "Removing the computer cover" on page 77. 3. Remove the direct cooling air baffle. See "Removing and reinstalling the direct cooling air baffle" on page 94. 4. Lay the computer on its side for easier access to the heat sink and fan assembly. 5. Locate the heat sink and fan assembly that does not work properly. See "Locating components" on page 4. 6. Disconnect the heat sink and fan assembly cable from the system board. 7. Follow this sequence to remove the four screws that secure the heat sink and fan assembly to the system board: a. Partially remove screw 1 , then fully remove screw 2 , and then fully remove screw 1 . b. Partially remove screw 3 , then fully remove screw 4 , and then fully remove screw 3 . Note: Carefully remove the four screws from the system board to avoid any possible damage to the system board. The four screws cannot be removed from the heat sink and fan assembly. Figure 63. Removing the heat sink and fan assembly 8. Lift the failing heat sink and fan assembly off the system board. 122 ThinkStation P900 User Guide
-
 1
1 -
2
-
3
-
4
-
5
-
6
-
7
-
8
-
9
-
10
-
11
-
12
-
13
-
14
-
15
-
16
-
17
-
18
-
19
-
20
-
21
-
22
-
23
-
24
-
25
-
26
-
27
-
28
-
29
-
30
-
31
-
32
-
33
-
34
-
35
-
36
-
37
-
38
-
39
-
40
-
41
-
42
-
43
-
44
-
45
-
46
-
47
-
48
-
49
-
50
-
51
-
52
-
53
-
54
-
55
-
56
-
57
-
58
-
59
-
60
-
61
-
62
-
63
-
64
-
65
-
66
-
67
-
68
-
69
-
70
-
71
-
72
-
73
-
74
-
75
-
76
-
77
-
78
-
79
-
80
-
81
-
82
-
83
-
84
-
85
-
86
-
87
-
88
-
89
-
90
-
91
-
92
-
93
-
94
-
95
-
96
-
97
-
98
-
99
-
100
-
101
-
102
-
103
-
104
-
105
-
106
-
107
-
108
-
109
-
110
-
111
-
112
-
113
-
114
-
115
-
116
-
117
-
118
-
119
-
120
-
121
-
122
-
123
-
124
-
125
-
126
-
127
-
128
-
 129
129 -
 130
130 -
 131
131 -
 132
132 -
 133
133 -
 134
134 -
 135
135 -
 136
136 -
 137
137 -
 138
138 -
 139
139 -
140
-
141
-
142
-
143
-
144
-
145
-
146
-
147
-
148
-
149
-
150
-
151
-
152
-
153
-
154
-
155
-
156
-
157
-
158
-
159
-
160
-
161
-
162
-
163
-
164
 |
 |
