Lexmark 9575 User's Guide - Page 45
Adjusting the display for easy viewing, Navigating the control panel menus
 |
UPC - 734646041348
View all Lexmark 9575 manuals
Add to My Manuals
Save this manual to your list of manuals |
Page 45 highlights
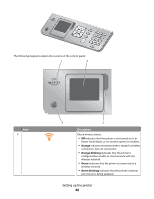
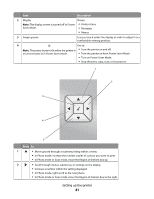
Adjusting the display for easy viewing You can tilt the control panel display to adjust it for easier viewing. 1 Place your finger in the finger groove to grasp the display from its underside. 2 Rotate the display forward to a comfortable viewing position. Navigating the control panel menus Use the control panel buttons to enter and exit menus, perform functions, or set or change default settings. 1 Press or repeatedly until the function you want is highlighted on the control panel display. 2 Press . The menu that matches the function you selected appears. Within each of these menus are menu items or submenus. For instance, the Copy Mode menu has a menu item called Color. Within each menu item or submenu, there are choices called values. For instance, the Color menu item has values of Color and Black & White. • Press or repeatedly to scroll through menu items or submenus. • Press or repeatedly to scroll through values. • In some menus, you can press to see a preview of the job before you start it. A job could be a print job, copy job, fax job, or scan job. The control panel menu screen indicates when you can press for a preview. • Before starting a job, if you want to make a change after you see the preview, press to adjust any choices or settings for this one job. It returns you to the menu so you can make changes. For example, if you were in the Copy Mode menu, press for the preview. Press to return to the Copy Mode menu to make additional changes. • Press repeatedly to return to previous menus. Pressing in some menus, such as the Change Default Settings menu, causes the values you selected to be saved. Understanding and using default settings Saved settings are called user default settings because you, the user, selected the values and saved them. The control panel refers to them as default settings. Setting up the printer 45
-
 1
1 -
2
-
3
-
4
-
5
-
6
-
7
-
8
-
9
-
10
-
11
-
12
-
13
-
14
-
15
-
16
-
17
-
18
-
19
-
20
-
21
-
22
-
23
-
24
-
25
-
26
-
27
-
28
-
29
-
30
-
31
-
32
-
33
-
34
-
35
-
36
-
37
-
38
-
39
-
 40
40 -
 41
41 -
 42
42 -
 43
43 -
 44
44 -
 45
45 -
 46
46 -
 47
47 -
 48
48 -
 49
49 -
 50
50 -
51
-
52
-
53
-
54
-
55
-
56
-
57
-
58
-
59
-
60
-
61
-
62
-
63
-
64
-
65
-
66
-
67
-
68
-
69
-
70
-
71
-
72
-
73
-
74
-
75
-
76
-
77
-
78
-
79
-
80
-
81
-
82
-
83
-
84
-
85
-
86
-
87
-
88
-
89
-
90
-
91
-
92
-
93
-
94
-
95
-
96
-
97
-
98
-
99
-
100
-
101
-
102
-
103
-
104
-
105
-
106
-
107
-
108
-
109
-
110
-
111
-
112
-
113
-
114
-
115
-
116
-
117
-
118
-
119
-
120
-
121
-
122
-
123
-
124
-
125
-
126
-
127
-
128
-
129
-
130
-
131
-
132
-
133
-
134
-
135
-
136
-
137
-
138
-
139
-
140
-
141
-
142
-
143
-
144
-
145
-
146
-
147
-
148
-
149
-
150
-
151
-
152
-
153
-
154
-
155
-
156
-
157
-
158
-
159
-
160
-
161
-
162
-
163
-
164
-
165
-
166
-
167
-
168
-
169
-
170
-
171
-
172
-
173
-
174
-
175
-
176
-
177
-
178
-
179
-
180
-
181
-
182
-
183
-
184
-
185
-
186
-
187
-
188
-
189
-
190
-
191
-
192
-
193
-
194
-
195
-
196
-
197
-
198
-
199
-
200
-
201
-
202
-
203
-
204
-
205
-
206
-
207
-
208
-
209
-
210
-
211
-
212
-
213
-
214
-
215
-
216
-
217
-
218
-
219
-
220
-
221
-
222
-
223
-
224
-
225
-
226
-
227
-
228
-
229
-
230
-
231
-
232
-
233
-
234
-
235
-
236
-
237
-
238
-
239
-
240
-
241
-
242
-
243
-
244
-
245
-
246
-
247
-
248
-
249
-
250
-
251
-
252
-
253
-
254
-
255
-
256
-
257
-
258
-
259
-
260
-
261
-
262
-
263
-
264
-
265
-
266
-
267
-
268
-
269
-
270
-
271
-
272
-
273
-
274
-
275
-
276
-
277
-
278
-
279
-
280
-
281
-
282
-
283
-
284
-
285
-
286
-
287
-
288
-
289
-
290
 |
 |
