Lexmark 9575 User's Guide - Page 85
Understanding the Paper Handling menu, Setup, Paper Handling
 |
UPC - 734646041348
View all Lexmark 9575 manuals
Add to My Manuals
Save this manual to your list of manuals |
Page 85 highlights
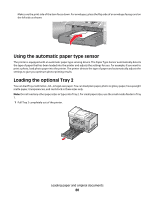
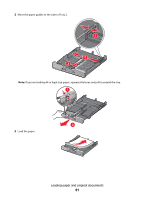
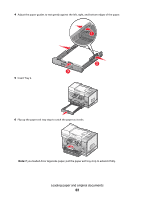
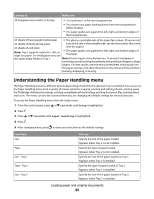
Load up to Make sure 50 transparencies in letter or A4 size • You load letter- or A4-size transparencies. • You remove any paper backing sheets from the transparencies before loading. • The paper guides rest against the left, right, and bottom edges of the transparencies. 25 sheets of heavyweight matte paper • The glossy or printable side of the paper faces down. (If you are not 25 sheets of photo/glossy paper sure which side is the printable side, see the instructions that came 25 sheets of card stock Note: Tray 2 supports only letter-, A4-, or legal-size paper. For small paper sizes, use with the paper.) • The paper guides rest against the left, right, and bottom edges of the paper. the small media feeder in Tray 1. Note: Photos require more drying time. To prevent smudging or scratching, avoid touching the printed surface with your fingers or sharp objects. For best results, remove each printed sheet individually from the paper exit tray, and allow the prints to dry at least 24 hours before stacking, displaying, or storing. Understanding the Paper Handling menu The Paper Handling menu has different options depending on whether the optional Tray 2 is installed. You can access the Paper Handling menu from a variety of menus related to copying, printing and editing photos, printing using the PictBridge default print settings, printing using Bluetooth technology, printing document files, printing faxes, and so on. The menu can also be accessed when you are changing the default settings for various functions. To access the Paper Handling menu from the Setup menu: 1 From the control panel, press or repeatedly until Setup is highlighted. 2 Press . 3 Press or repeatedly until Paper Handling is highlighted. 4 Press . 5 After changing values, press to save your selections as the default settings. From here Size Type Size - Tray 1 Type - Tray 1 Size - Tray 2 You can Specify the size of the paper loaded. Appears when Tray 2 is not installed. Specify the type of paper loaded. Appears when Tray 2 is not installed. Specify the size of the paper loaded in Tray 1. Appears when Tray 2 is installed. Specify the type of paper loaded in Tray 1. Appears when Tray 2 is installed. Specify the size of the paper loaded in Tray 2. Appears when Tray 2 is installed. Loading paper and original documents 85
-
 1
1 -
2
-
3
-
4
-
5
-
6
-
7
-
8
-
9
-
10
-
11
-
12
-
13
-
14
-
15
-
16
-
17
-
18
-
19
-
20
-
21
-
22
-
23
-
24
-
25
-
26
-
27
-
28
-
29
-
30
-
31
-
32
-
33
-
34
-
35
-
36
-
37
-
38
-
39
-
40
-
41
-
42
-
43
-
44
-
45
-
46
-
47
-
48
-
49
-
50
-
51
-
52
-
53
-
54
-
55
-
56
-
57
-
58
-
59
-
60
-
61
-
62
-
63
-
64
-
65
-
66
-
67
-
68
-
69
-
70
-
71
-
72
-
73
-
74
-
75
-
76
-
77
-
78
-
79
-
 80
80 -
 81
81 -
 82
82 -
 83
83 -
 84
84 -
 85
85 -
 86
86 -
 87
87 -
 88
88 -
 89
89 -
 90
90 -
91
-
92
-
93
-
94
-
95
-
96
-
97
-
98
-
99
-
100
-
101
-
102
-
103
-
104
-
105
-
106
-
107
-
108
-
109
-
110
-
111
-
112
-
113
-
114
-
115
-
116
-
117
-
118
-
119
-
120
-
121
-
122
-
123
-
124
-
125
-
126
-
127
-
128
-
129
-
130
-
131
-
132
-
133
-
134
-
135
-
136
-
137
-
138
-
139
-
140
-
141
-
142
-
143
-
144
-
145
-
146
-
147
-
148
-
149
-
150
-
151
-
152
-
153
-
154
-
155
-
156
-
157
-
158
-
159
-
160
-
161
-
162
-
163
-
164
-
165
-
166
-
167
-
168
-
169
-
170
-
171
-
172
-
173
-
174
-
175
-
176
-
177
-
178
-
179
-
180
-
181
-
182
-
183
-
184
-
185
-
186
-
187
-
188
-
189
-
190
-
191
-
192
-
193
-
194
-
195
-
196
-
197
-
198
-
199
-
200
-
201
-
202
-
203
-
204
-
205
-
206
-
207
-
208
-
209
-
210
-
211
-
212
-
213
-
214
-
215
-
216
-
217
-
218
-
219
-
220
-
221
-
222
-
223
-
224
-
225
-
226
-
227
-
228
-
229
-
230
-
231
-
232
-
233
-
234
-
235
-
236
-
237
-
238
-
239
-
240
-
241
-
242
-
243
-
244
-
245
-
246
-
247
-
248
-
249
-
250
-
251
-
252
-
253
-
254
-
255
-
256
-
257
-
258
-
259
-
260
-
261
-
262
-
263
-
264
-
265
-
266
-
267
-
268
-
269
-
270
-
271
-
272
-
273
-
274
-
275
-
276
-
277
-
278
-
279
-
280
-
281
-
282
-
283
-
284
-
285
-
286
-
287
-
288
-
289
-
290
 |
 |
