Lexmark 9575 User's Guide - Page 53
Setting up the printer, to scroll between the hours and minutes.
 |
UPC - 734646041348
View all Lexmark 9575 manuals
Add to My Manuals
Save this manual to your list of manuals |
Page 53 highlights
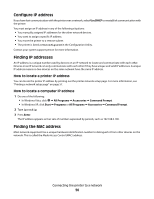
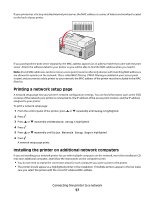
Setting up the printer The following instructions are for setting up the printer for the first time. After completing these steps, you do not need to set up the printer again if you want to use it on another computer. Note: You must complete these steps before you set up the printer on a network. 1 Unpack the printer. Note: Place the printer near the computer during setup. If you're setting up on a wireless network, you can move the printer after setup is complete. 2 Remove all tape and packing material from all areas of the printer. 3 If needed, install the correct control panel for your language. 4 Pull the paper tray completely out of the printer. 5 Move the paper guides to the sides. 6 Load paper. 7 Adjust the paper guides. 8 Insert the paper tray. 9 Connect the power cord to the printer and then to a properly grounded electrical outlet. Note: Do not attach the USB cable yet. 10 Make sure the power is on. 11 Set the language and country/region. a Press or repeatedly until the language you want appears on the display. b Press . c Press or repeatedly until the country/region you want appears on the display. d Press . 12 Set the date and time. a Use the keypad to enter the time, and press or to scroll between the hours and minutes. b Press or to scroll to AM, PM, or 24HR, and press or to change the setting. c Press . d Use the keypad to enter the date, and press or to scroll between day, month, and year. e Press . 13 Set the fax name and fax number, if needed. a Use the keypad to enter the fax number. b Press . c Use the keypad to enter the fax name. d Press . 14 Open the printer. 15 Press down on the cartridge carrier levers. Connecting the printer to a network 53
-
 1
1 -
2
-
3
-
4
-
5
-
6
-
7
-
8
-
9
-
10
-
11
-
12
-
13
-
14
-
15
-
16
-
17
-
18
-
19
-
20
-
21
-
22
-
23
-
24
-
25
-
26
-
27
-
28
-
29
-
30
-
31
-
32
-
33
-
34
-
35
-
36
-
37
-
38
-
39
-
40
-
41
-
42
-
43
-
44
-
45
-
46
-
47
-
 48
48 -
 49
49 -
 50
50 -
 51
51 -
 52
52 -
 53
53 -
 54
54 -
 55
55 -
 56
56 -
 57
57 -
 58
58 -
59
-
60
-
61
-
62
-
63
-
64
-
65
-
66
-
67
-
68
-
69
-
70
-
71
-
72
-
73
-
74
-
75
-
76
-
77
-
78
-
79
-
80
-
81
-
82
-
83
-
84
-
85
-
86
-
87
-
88
-
89
-
90
-
91
-
92
-
93
-
94
-
95
-
96
-
97
-
98
-
99
-
100
-
101
-
102
-
103
-
104
-
105
-
106
-
107
-
108
-
109
-
110
-
111
-
112
-
113
-
114
-
115
-
116
-
117
-
118
-
119
-
120
-
121
-
122
-
123
-
124
-
125
-
126
-
127
-
128
-
129
-
130
-
131
-
132
-
133
-
134
-
135
-
136
-
137
-
138
-
139
-
140
-
141
-
142
-
143
-
144
-
145
-
146
-
147
-
148
-
149
-
150
-
151
-
152
-
153
-
154
-
155
-
156
-
157
-
158
-
159
-
160
-
161
-
162
-
163
-
164
-
165
-
166
-
167
-
168
-
169
-
170
-
171
-
172
-
173
-
174
-
175
-
176
-
177
-
178
-
179
-
180
-
181
-
182
-
183
-
184
-
185
-
186
-
187
-
188
-
189
-
190
-
191
-
192
-
193
-
194
-
195
-
196
-
197
-
198
-
199
-
200
-
201
-
202
-
203
-
204
-
205
-
206
-
207
-
208
-
209
-
210
-
211
-
212
-
213
-
214
-
215
-
216
-
217
-
218
-
219
-
220
-
221
-
222
-
223
-
224
-
225
-
226
-
227
-
228
-
229
-
230
-
231
-
232
-
233
-
234
-
235
-
236
-
237
-
238
-
239
-
240
-
241
-
242
-
243
-
244
-
245
-
246
-
247
-
248
-
249
-
250
-
251
-
252
-
253
-
254
-
255
-
256
-
257
-
258
-
259
-
260
-
261
-
262
-
263
-
264
-
265
-
266
-
267
-
268
-
269
-
270
-
271
-
272
-
273
-
274
-
275
-
276
-
277
-
278
-
279
-
280
-
281
-
282
-
283
-
284
-
285
-
286
-
287
-
288
-
289
-
290
 |
 |
