Lexmark 9575 User's Guide - Page 74
Loading envelopes or 10 x 15 cm (4 x 6 in.) photo paper in Tray 1, Warning-Potential Damage, Notes
 |
UPC - 734646041348
View all Lexmark 9575 manuals
Add to My Manuals
Save this manual to your list of manuals |
Page 74 highlights
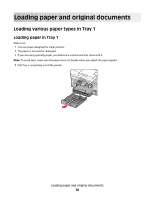
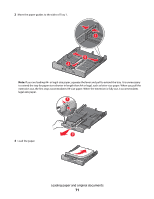
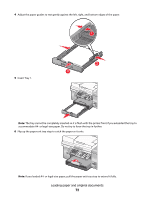
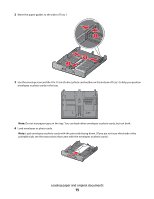
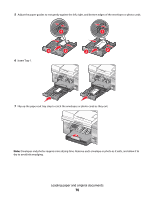
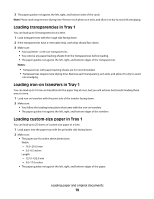
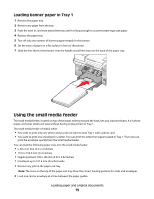
Load up to 10 envelopes Make sure • The envelopes are designed for use with inkjet printers. • The printable side of the envelopes faces down with the flap to the left as shown. • You load the envelopes in the center of the tray as indicated by the icon. Load them vertically and all the way to the back of Tray 1. • You print the envelopes in landscape orientation. • The paper guides rest against the left, right, and bottom edges of the envelopes. • You select the correct envelope size. If the exact envelope size is not listed, select the next larger size. Set the left and right margins so that the envelope text will be correctly positioned on the envelope. Warning-Potential Damage: Do not use envelopes that have metal clasps, string ties, or metal folding bars. Notes: • Do not load envelopes with holes, perforations, cutouts, or deep embossing. • Do not use envelopes that have exposed flap adhesive. • Envelopes require more drying time. Remove each envelope as it exits, and allow it to dry to avoid ink smudging. Loading envelopes or 10 x 15 cm (4 x 6 in.) photo paper in Tray 1 1 Pull Tray 1 completely out of the printer. Loading paper and original documents 74
-
 1
1 -
2
-
3
-
4
-
5
-
6
-
7
-
8
-
9
-
10
-
11
-
12
-
13
-
14
-
15
-
16
-
17
-
18
-
19
-
20
-
21
-
22
-
23
-
24
-
25
-
26
-
27
-
28
-
29
-
30
-
31
-
32
-
33
-
34
-
35
-
36
-
37
-
38
-
39
-
40
-
41
-
42
-
43
-
44
-
45
-
46
-
47
-
48
-
49
-
50
-
51
-
52
-
53
-
54
-
55
-
56
-
57
-
58
-
59
-
60
-
61
-
62
-
63
-
64
-
65
-
66
-
67
-
68
-
 69
69 -
 70
70 -
 71
71 -
 72
72 -
 73
73 -
 74
74 -
 75
75 -
 76
76 -
 77
77 -
 78
78 -
 79
79 -
80
-
81
-
82
-
83
-
84
-
85
-
86
-
87
-
88
-
89
-
90
-
91
-
92
-
93
-
94
-
95
-
96
-
97
-
98
-
99
-
100
-
101
-
102
-
103
-
104
-
105
-
106
-
107
-
108
-
109
-
110
-
111
-
112
-
113
-
114
-
115
-
116
-
117
-
118
-
119
-
120
-
121
-
122
-
123
-
124
-
125
-
126
-
127
-
128
-
129
-
130
-
131
-
132
-
133
-
134
-
135
-
136
-
137
-
138
-
139
-
140
-
141
-
142
-
143
-
144
-
145
-
146
-
147
-
148
-
149
-
150
-
151
-
152
-
153
-
154
-
155
-
156
-
157
-
158
-
159
-
160
-
161
-
162
-
163
-
164
-
165
-
166
-
167
-
168
-
169
-
170
-
171
-
172
-
173
-
174
-
175
-
176
-
177
-
178
-
179
-
180
-
181
-
182
-
183
-
184
-
185
-
186
-
187
-
188
-
189
-
190
-
191
-
192
-
193
-
194
-
195
-
196
-
197
-
198
-
199
-
200
-
201
-
202
-
203
-
204
-
205
-
206
-
207
-
208
-
209
-
210
-
211
-
212
-
213
-
214
-
215
-
216
-
217
-
218
-
219
-
220
-
221
-
222
-
223
-
224
-
225
-
226
-
227
-
228
-
229
-
230
-
231
-
232
-
233
-
234
-
235
-
236
-
237
-
238
-
239
-
240
-
241
-
242
-
243
-
244
-
245
-
246
-
247
-
248
-
249
-
250
-
251
-
252
-
253
-
254
-
255
-
256
-
257
-
258
-
259
-
260
-
261
-
262
-
263
-
264
-
265
-
266
-
267
-
268
-
269
-
270
-
271
-
272
-
273
-
274
-
275
-
276
-
277
-
278
-
279
-
280
-
281
-
282
-
283
-
284
-
285
-
286
-
287
-
288
-
289
-
290
 |
 |
