Lexmark C720 Setup Guide - Page 110
Windows NT Server 4.0, Start, Settings, Control Panel, Network, Protocols. - pdf
 |
View all Lexmark C720 manuals
Add to My Manuals
Save this manual to your list of manuals |
Page 110 highlights
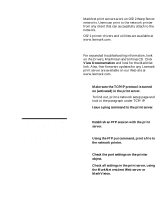
Windows NT Server 4.0 Note: The file you use with FTP can be in PCL, PostScript, PDF, HTML or any other language the printer understands. If the file prints, this confirms the TCP/IP protocol is working properly in the MarkNet print server. 1 Make sure you are using TCP/IP for com- munications between the Windows server and the MarkNet print server. 2 Make sure TCP/IP is turned on (activated) in the print server. To find out, print a network setup page and look in the paragraph under TCP/IP. 3 Verify that TCP/IP is installed properly on the Windows server. (Hint: Start, Settings, Control Panel, Network, Protocols.) 4 Issue a ping command to the print server. ping 192.168.236.24 5 Establish an FTP session with the print server. ftp 192.168.236.24 6 Using the FTP put command, print a file. put mytest.ps 7 Verify the network printer shows up in MarkVision: - If it doesn't, the print server may have down-level firmware. - If it does but you still cannot print, try removing, then re-adding the Lexmark Network Port on the printer object. 8 Reset both the print server and the printer. 9 If possible, shut down Windows NT Server and restart the server. You may be experiencing a spooler problem that requires a restart. 106 Configure the network printer
-
 1
1 -
2
-
3
-
4
-
5
-
6
-
7
-
8
-
9
-
10
-
11
-
12
-
13
-
14
-
15
-
16
-
17
-
18
-
19
-
20
-
21
-
22
-
23
-
24
-
25
-
26
-
27
-
28
-
29
-
30
-
31
-
32
-
33
-
34
-
35
-
36
-
37
-
38
-
39
-
40
-
41
-
42
-
43
-
44
-
45
-
46
-
47
-
48
-
49
-
50
-
51
-
52
-
53
-
54
-
55
-
56
-
57
-
58
-
59
-
60
-
61
-
62
-
63
-
64
-
65
-
66
-
67
-
68
-
69
-
70
-
71
-
72
-
73
-
74
-
75
-
76
-
77
-
78
-
79
-
80
-
81
-
82
-
83
-
84
-
85
-
86
-
87
-
88
-
89
-
90
-
91
-
92
-
93
-
94
-
95
-
96
-
97
-
98
-
99
-
100
-
101
-
102
-
103
-
104
-
 105
105 -
 106
106 -
 107
107 -
 108
108 -
 109
109 -
 110
110 -
 111
111 -
 112
112 -
 113
113 -
 114
114 -
 115
115 -
116
-
117
 |
 |
