Lexmark X4975 User's Guide - Page 21
Orange, Orange blinking, Green, Use - wireless photo printer
 |
UPC - 734646081399
View all Lexmark X4975 manuals
Add to My Manuals
Save this manual to your list of manuals |
Page 21 highlights
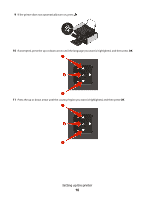
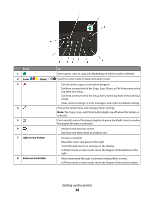
Use the To 4 Automatic Document Feeder (ADF) tray Load original documents in the ADF. Recommended for scanning, copying, or faxing multiple-page documents. Note: Do not load postcards, photos, small items, or thin media (such as magazine clippings) into the ADF. Place these items on the scanner glass. 5 Automatic Document Feeder (ADF) output tray Hold documents as they exit from the ADF. 6 Wi-Fi indicator Check wireless status: Note: Your printer model may not have wireless • Off indicates that the printer is not turned on or that capability and may not have this indicator. no wireless option is installed. • Orange - indicates that the printer is ready to be configured for wireless printing - indicates that the printer is connected for USB printing • Orange blinking indicates that the printer is configured but is unable to communicate with the wireless network. • Green indicates that the printer is connected to a wireless network. 7 Memory card slots Insert a memory card. 8 PictBridge port Connect a PictBridge-enabled digital camera or a flash drive to the printer. 9 Printer control panel Operate the printer. 10 Paper exit tray Hold paper as it exits. 11 Automatic Document Feeder (ADF) paper guide Keep paper straight when feeding into the ADF. 12 Automatic Document Feeder (ADF) Scan, copy, or fax multiple-page letter-, legal-, and A4-size documents. 13 Scanner glass Scan and copy photos and documents. 14 Top cover Access the scanner glass. Setting up the printer 21
-
 1
1 -
2
-
3
-
4
-
5
-
6
-
7
-
8
-
9
-
10
-
11
-
12
-
13
-
14
-
15
-
 16
16 -
 17
17 -
 18
18 -
 19
19 -
 20
20 -
 21
21 -
 22
22 -
 23
23 -
 24
24 -
 25
25 -
 26
26 -
27
-
28
-
29
-
30
-
31
-
32
-
33
-
34
-
35
-
36
-
37
-
38
-
39
-
40
-
41
-
42
-
43
-
44
-
45
-
46
-
47
-
48
-
49
-
50
-
51
-
52
-
53
-
54
-
55
-
56
-
57
-
58
-
59
-
60
-
61
-
62
-
63
-
64
-
65
-
66
-
67
-
68
-
69
-
70
-
71
-
72
-
73
-
74
-
75
-
76
-
77
-
78
-
79
-
80
-
81
-
82
-
83
-
84
-
85
-
86
-
87
-
88
-
89
-
90
-
91
-
92
-
93
-
94
-
95
-
96
-
97
-
98
-
99
-
100
-
101
-
102
-
103
-
104
-
105
-
106
-
107
-
108
-
109
-
110
-
111
-
112
-
113
-
114
-
115
-
116
-
117
-
118
-
119
-
120
-
121
-
122
-
123
-
124
-
125
-
126
-
127
-
128
-
129
-
130
-
131
-
132
-
133
-
134
-
135
-
136
-
137
-
138
-
139
-
140
-
141
-
142
-
143
-
144
-
145
-
146
-
147
-
148
-
149
 |
 |
