Lexmark X4975 User's Guide - Page 31
Using the Windows printer software, Browse, Computer, Drivers, readme
 |
UPC - 734646081399
View all Lexmark X4975 manuals
Add to My Manuals
Save this manual to your list of manuals |
Page 31 highlights
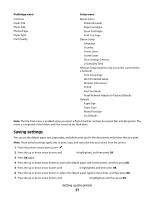
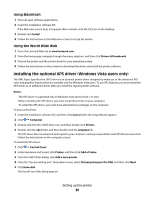
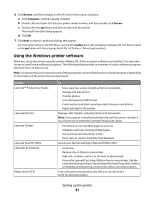
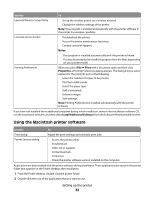
6 Click Browse, and then navigate to the XPS driver files on your computer: a Click Computer, and then double-click (C:). b Double-click the folder that has your printer model number, and then double-click Drivers. c Double-click the xps folder, and then double-click the xps file. The Install From Disk dialog appears. d Click OK. 7 Click Next on the two additional dialogs that appear. For more information on the XPS driver, see the XPS readme file on the installation software CD. The file is located in the xps folder with the setupxps batch file (:\Drivers\xps\readme). Using the Windows printer software When you set up the printer using the printer software CD, all the necessary software was installed. You may have chosen to install some additional programs. The following table provides an overview of various software programs and what they can help you do. Note: Your printer may not come with some of these programs or some of the functions of these programs, depending on the features of the printer that you purchased. Use the LexmarkTM Productivity Studio Lexmark Fast Pics Lexmark Toolbar Lexmark Tools for Office Lexmark Fax Solutions Abbyy Sprint OCR To • Scan, copy, fax, e-mail, or print a photo or document. • Manage and edit photos. • Transfer photos. • Scan documents to PDF format. • Create posters and photo greeting cards from your own photos. • Adjust settings for the printer. Manage, edit, transfer, and print photos and documents. Note: This program is installed automatically with the printer software if you choose not to install the Lexmark Productivity Studio. • Print black or text-only Web pages to save ink. • Schedule automatic printing of Web pages. • Access Picnik and edit photos online. • Print, scan, or convert local files from Windows. Access your favorite settings in Microsoft Office 2007. • Send a fax. • Receive a fax in three-in-one printers. • Add, edit, or delete contacts in the built-in phone book. • Access the Lexmark Fax Setup Utility in four-in-one printers. Use the Lexmark Fax Setup Utility to set the Speed Dial and Group Dial numbers, set Ringing and Answering, and print fax history and status reports. Scan a document and produce text that you can edit with a word-processing program. Setting up the printer 31
-
 1
1 -
2
-
3
-
4
-
5
-
6
-
7
-
8
-
9
-
10
-
11
-
12
-
13
-
14
-
15
-
16
-
17
-
18
-
19
-
20
-
21
-
22
-
23
-
24
-
25
-
 26
26 -
 27
27 -
 28
28 -
 29
29 -
 30
30 -
 31
31 -
 32
32 -
 33
33 -
 34
34 -
 35
35 -
 36
36 -
37
-
38
-
39
-
40
-
41
-
42
-
43
-
44
-
45
-
46
-
47
-
48
-
49
-
50
-
51
-
52
-
53
-
54
-
55
-
56
-
57
-
58
-
59
-
60
-
61
-
62
-
63
-
64
-
65
-
66
-
67
-
68
-
69
-
70
-
71
-
72
-
73
-
74
-
75
-
76
-
77
-
78
-
79
-
80
-
81
-
82
-
83
-
84
-
85
-
86
-
87
-
88
-
89
-
90
-
91
-
92
-
93
-
94
-
95
-
96
-
97
-
98
-
99
-
100
-
101
-
102
-
103
-
104
-
105
-
106
-
107
-
108
-
109
-
110
-
111
-
112
-
113
-
114
-
115
-
116
-
117
-
118
-
119
-
120
-
121
-
122
-
123
-
124
-
125
-
126
-
127
-
128
-
129
-
130
-
131
-
132
-
133
-
134
-
135
-
136
-
137
-
138
-
139
-
140
-
141
-
142
-
143
-
144
-
145
-
146
-
147
-
148
-
149
 |
 |