Lexmark X4975 User's Guide - Page 27
Saving settings, Defaults, Paper Type, Photo Print Size - ink
 |
UPC - 734646081399
View all Lexmark X4975 manuals
Add to My Manuals
Save this manual to your list of manuals |
Page 27 highlights
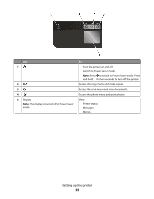
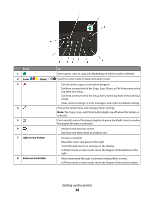
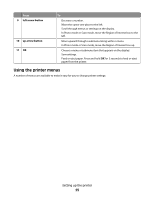
PictBridge menu Continue Paper Size Photo Size Photos/Page Paper Type Print Quality Setup menu Maintenance • Check Ink Levels • Align Cartridges • Clean Cartridges • Print Test Page Device Setup • Language • Country • Power Saver • Screen Saver • Clear Settings Timeout • 2-Sided Dry Time Network Setup (appears only in printers connected to a network) • Print Setup Page • Wi-Fi Protected Setup • Wireless Information • TCP/IP • File Print Mode • Reset Network Adapter to Factory Defaults Defaults • Paper Size • Paper Type • Photo Print Size • Set Defaults Note: The File Print menu is enabled when you insert a flash drive that contains document files into the printer. The menu is composed of the folders and files stored on the flash drive. Saving settings You can set the default paper size, paper type, and photo print size for the documents and photos that you print. Note: These default settings apply only to print, copy, and scan jobs that you initiate from the printer. 1 From the printer control panel, press . 2 Press the up or down arrow button until Defaults is highlighted, and then press OK. 3 Press OK again. 4 Press the up or down arrow button to select the default paper size for the printer, and then press OK. 5 Press the up or down arrow button until Paper Type is highlighted, and then press OK. 6 Press the up or down arrow button to select the default paper type for the printer, and then press OK. 7 Press the up or down arrow button until Photo Print Size is highlighted, and then press OK. Setting up the printer 27
-
 1
1 -
2
-
3
-
4
-
5
-
6
-
7
-
8
-
9
-
10
-
11
-
12
-
13
-
14
-
15
-
16
-
17
-
18
-
19
-
20
-
21
-
 22
22 -
 23
23 -
 24
24 -
 25
25 -
 26
26 -
 27
27 -
 28
28 -
 29
29 -
 30
30 -
 31
31 -
 32
32 -
33
-
34
-
35
-
36
-
37
-
38
-
39
-
40
-
41
-
42
-
43
-
44
-
45
-
46
-
47
-
48
-
49
-
50
-
51
-
52
-
53
-
54
-
55
-
56
-
57
-
58
-
59
-
60
-
61
-
62
-
63
-
64
-
65
-
66
-
67
-
68
-
69
-
70
-
71
-
72
-
73
-
74
-
75
-
76
-
77
-
78
-
79
-
80
-
81
-
82
-
83
-
84
-
85
-
86
-
87
-
88
-
89
-
90
-
91
-
92
-
93
-
94
-
95
-
96
-
97
-
98
-
99
-
100
-
101
-
102
-
103
-
104
-
105
-
106
-
107
-
108
-
109
-
110
-
111
-
112
-
113
-
114
-
115
-
116
-
117
-
118
-
119
-
120
-
121
-
122
-
123
-
124
-
125
-
126
-
127
-
128
-
129
-
130
-
131
-
132
-
133
-
134
-
135
-
136
-
137
-
138
-
139
-
140
-
141
-
142
-
143
-
144
-
145
-
146
-
147
-
148
-
149
 |
 |