Lexmark X4975 User's Guide - Page 83
Copying, Making copies, Copying photos
 |
UPC - 734646081399
View all Lexmark X4975 manuals
Add to My Manuals
Save this manual to your list of manuals |
Page 83 highlights
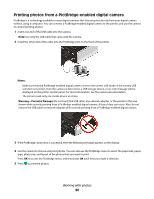
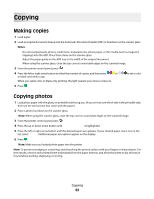
Copying Making copies 1 Load paper. 2 Load an original document faceup into the Automatic Document Feeder (ADF) or facedown on the scanner glass. Notes: • Do not load postcards, photos, small items, transparencies, photo paper, or thin media (such as magazine clippings) into the ADF. Place these items on the scanner glass. • Adjust the paper guide on the ADF tray to the width of the original document. • When using the scanner glass, close the top cover to avoid dark edges on the scanned image. 3 From the printer control panel, press . 4 Press the left or right arrow button to select the number of copies, and then press or to set a color or black-and-white copy. When you select color or black-only printing, the light nearest your choice comes on. 5 Press . Copying photos 1 Load photo paper with the glossy or printable side facing you. (If you are not sure which side is the printable side, then see the instructions that came with the paper.) 2 Place a photo facedown on the scanner glass. Note: When using the scanner glass, close the top cover to avoid dark edges on the scanned image. 3 From the printer control panel, press . 4 Press the up or down arrow button until Photo Reprint is highlighted. 5 Press the left or right arrow button until the desired paper size appears. If your desired paper size is not on the list, select Other. Additional paper size options appear on the display. 6 Press . Note: Make sure you loaded photo paper into the printer. Note: To prevent smudging or scratching, avoid touching the printed surface with your fingers or sharp objects. For best results, remove each printed sheet individually from the paper exit tray, and allow the prints to dry at least 24 hours before stacking, displaying, or storing. Copying 83
-
 1
1 -
2
-
3
-
4
-
5
-
6
-
7
-
8
-
9
-
10
-
11
-
12
-
13
-
14
-
15
-
16
-
17
-
18
-
19
-
20
-
21
-
22
-
23
-
24
-
25
-
26
-
27
-
28
-
29
-
30
-
31
-
32
-
33
-
34
-
35
-
36
-
37
-
38
-
39
-
40
-
41
-
42
-
43
-
44
-
45
-
46
-
47
-
48
-
49
-
50
-
51
-
52
-
53
-
54
-
55
-
56
-
57
-
58
-
59
-
60
-
61
-
62
-
63
-
64
-
65
-
66
-
67
-
68
-
69
-
70
-
71
-
72
-
73
-
74
-
75
-
76
-
77
-
 78
78 -
 79
79 -
 80
80 -
 81
81 -
 82
82 -
 83
83 -
 84
84 -
 85
85 -
 86
86 -
 87
87 -
 88
88 -
89
-
90
-
91
-
92
-
93
-
94
-
95
-
96
-
97
-
98
-
99
-
100
-
101
-
102
-
103
-
104
-
105
-
106
-
107
-
108
-
109
-
110
-
111
-
112
-
113
-
114
-
115
-
116
-
117
-
118
-
119
-
120
-
121
-
122
-
123
-
124
-
125
-
126
-
127
-
128
-
129
-
130
-
131
-
132
-
133
-
134
-
135
-
136
-
137
-
138
-
139
-
140
-
141
-
142
-
143
-
144
-
145
-
146
-
147
-
148
-
149
 |
 |