Lexmark XC9235 User Guide - Page 91
Replacing the transfer roller
 |
View all Lexmark XC9235 manuals
Add to My Manuals
Save this manual to your list of manuals |
Page 91 highlights
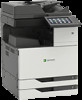
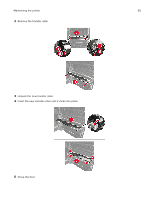
Maintaining the printer 91 9 Using the printhead wiper, clean the printhead lens. 10 Insert the paper guide. 11 Secure the transfer belt. 12 Reattach the door stopper. 13 Close the door, and then turn on the printer. Replacing the transfer roller 1 Open door C. Notes: • Make sure that the door does not hit any cable attached to the printer. • If a 3000‑sheet tray is installed, then slide the tray to the right to open the door. CAUTION-HOT SURFACE: The inside of the printer might be hot. To reduce the risk of injury from a hot component, allow the surface to cool before touching it.
-
 1
1 -
2
-
3
-
4
-
5
-
6
-
7
-
8
-
9
-
10
-
11
-
12
-
13
-
14
-
15
-
16
-
17
-
18
-
19
-
20
-
21
-
22
-
23
-
24
-
25
-
26
-
27
-
28
-
29
-
30
-
31
-
32
-
33
-
34
-
35
-
36
-
37
-
38
-
39
-
40
-
41
-
42
-
43
-
44
-
45
-
46
-
47
-
48
-
49
-
50
-
51
-
52
-
53
-
54
-
55
-
56
-
57
-
58
-
59
-
60
-
61
-
62
-
63
-
64
-
65
-
66
-
67
-
68
-
69
-
70
-
71
-
72
-
73
-
74
-
75
-
76
-
77
-
78
-
79
-
80
-
81
-
82
-
83
-
84
-
85
-
 86
86 -
 87
87 -
 88
88 -
 89
89 -
 90
90 -
 91
91 -
 92
92 -
 93
93 -
 94
94 -
 95
95 -
 96
96 -
97
-
98
-
99
-
100
-
101
-
102
-
103
-
104
-
105
-
106
-
107
-
108
-
109
-
110
-
111
-
112
-
113
-
114
-
115
-
116
-
117
-
118
-
119
-
120
-
121
-
122
-
123
-
124
-
125
-
126
-
127
-
128
-
129
-
130
-
131
-
132
-
133
-
134
-
135
-
136
-
137
-
138
-
139
-
140
-
141
-
142
-
143
-
144
-
145
-
146
-
147
-
148
-
149
-
150
-
151
-
152
-
153
-
154
-
155
-
156
-
157
-
158
-
159
-
160
-
161
-
162
-
163
-
164
-
165
-
166
-
167
-
168
-
169
-
170
-
171
-
172
-
173
-
174
-
175
-
176
-
177
-
178
-
179
-
180
-
181
-
182
-
183
-
184
-
185
-
186
-
187
-
188
-
189
-
190
-
191
-
192
-
193
-
194
-
195
-
196
-
197
-
198
-
199
-
200
-
201
-
202
-
203
-
204
-
205
-
206
-
207
-
208
-
209
-
210
-
211
-
212
-
213
-
214
-
215
-
216
-
217
-
218
-
219
 |
 |

9
Using the printhead wiper, clean the printhead lens.
10
Insert the paper guide.
11
Secure the transfer belt.
12
Reattach the door stopper.
13
Close the door, and then turn on the printer.
Replacing the transfer roller
1
Open door C.
Notes:
•
Make sure that the door does not hit any cable attached to the printer.
•
If a 3000
‑
sheet tray is installed, then slide the tray to the right to open the door.
CAUTION—HOT SURFACE:
The inside of the printer might be hot. To reduce the risk of injury from a
hot component, allow the surface to cool before touching it.
Maintaining the printer
91