Meade Tripod LX600-ACF 14 inch User Manual - Page 13
&, 2&, 3&
 |
View all Meade Tripod LX600-ACF 14 inch manuals
Add to My Manuals
Save this manual to your list of manuals |
Page 13 highlights
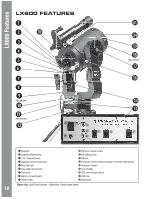
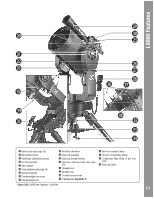
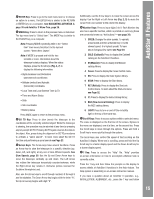
LX600 Features and for current and future Meade accessories. Your PC can control your LX600 ACF telescope using the supplied AutoStar Suite software for custom applications. Go to the Meade website (www.meade.com) to download the latest serial commands and device pinouts. H. Auxillary Autoguider Port: If you wish to use an add-on autoguider in place of the integrated StarLock, plug the autoguider cable into this port. See the instruction sheet that came with your autoguider for more information. 1$ Tiltable AutoStar II Holder: Attach to fork handles (see 1% below) or X-Wedge. Holds your handbox in a convenient location. 1% Fork Handles: Use to lift optical tube assembly or to rotate the telescope when attached to the tripod. Important After the telescope is aligned do not use the RA or DEC manual slow motion controls or alignment will be lost and the telescope will need to be realigned. 1^ Declination (DEC) Slow-Motion Control: Make fine adjustments in declination (altitude) by turning this control. In order for this control to operate properly, power must be off. 1& DEC Lock: Controls the manual vertical movement of the telescope. Turning the DEC lock counterclockwise unlocks the telescope, enabling it to be freely rotated by hand about the vertical axis. Turning the DEC lock clockwise (to a firm feel only) prevents the telescope from being moved manually, but engages the vertical motor drive for AutoStar II operation. Caution: When loosening the DEC lock, be sure to support the optical tube (Fig. 1, 19). The weight of the tube could cause the tube to swing through the fork arms suddenly. 1* Dust Cover: Gently pry the dust cover from the front lens of the telescope. Note: The dust cover should be replaced after each observing session and the power turned off to the telescope. Verify that any dew that might have collected during the observing session has evaporated prior to replacing the dust cover. 1( Optical Tube: The main optical component that gathers the light from distant objects and brings this light to a focus for examination through the eyepiece. 2) Declination (DEC) Setting Circle: See Appendix E, page 57, for detailed information. 2! Viewfinder Collimation Screws: Use these six screws to adjust the alignment of the viewfinder. 2@ 8 x 50mm Viewfinder: A low-power, wide-field sighting scope with crosshairs that enables easy centering of objects in the telescope eyepiece. 2# GPS Receiver: Receives information transmitted from Global Positioning System satellites. See page 24 for more information. 2$ Tube Adapters: The optical and mechanical axes of the LX600 telescope have been carefully aligned at the factory to ensure accurate object pointing. Do not loosen or remove the optical tube assembly from the tube adapters. The resulting misalignment of the axes will result in inaccurate pointing of the telescope in the GO TO mode. 2% StarLock Counterweight(s): Precisely counter balance the StarLock assembly and optional accessories by moving this weight. 2^ StarLock Counterweight Hex Screws: Tighten to secure the counterweight in place. 2& StarLock Counterweight Rail: Slide the StarLock counterweight along this rail to achieve optimum balance. 2* AutoStar II Handbox: The LX600 user interface. Use the Handbox to command the LX600 to automatically slew to any object in the night sky. See pages 27 thru 36 for a description of features. 2( StarLock Assembly: Integrated autoguiding unit made up of the StarLock narrowfield OTA and sensor, used for highprecision guiding, and the StarLock widefield OTA and sensor, used in alignment and ultra-precise pointing. 3) StarLock Dovetail Adapter: Attaches StarLock to the telescope mount. 3! StarLock Retaining Bolts: Secures the StarLock assembly to the dovetail adapter. 3@ Tripod Threaded Rod: Secures the LX600 mount to the tripod. 3# Tripod Spreader Bar: Holds the LX600 mount and tripod legs in place. 3$ Tripod T-handle Tension Knob: Use to apply tension to the tripod spreader bar. 3% X-Wedge: See Appendix F for details. 3^ Fork Arm Jumper Connector: Bridges the break between OTA and Telescope base. 3& Fork Arm Connecting Plate: Mates OTA to base for easier assembly. Four connecting screws per side(See Appendix D). 3* Connecting Plate Bolt: Used to secure the OTA to Telescope base. Four (4) connecting screws per side. 13
-
 1
1 -
2
-
3
-
4
-
5
-
6
-
7
-
 8
8 -
 9
9 -
 10
10 -
 11
11 -
 12
12 -
 13
13 -
 14
14 -
 15
15 -
 16
16 -
 17
17 -
 18
18 -
19
-
20
-
21
-
22
-
23
-
24
-
25
-
26
-
27
-
28
-
29
-
30
-
31
-
32
-
33
-
34
-
35
-
36
-
37
-
38
-
39
-
40
-
41
-
42
-
43
-
44
-
45
-
46
-
47
-
48
-
49
-
50
-
51
-
52
-
53
-
54
-
55
-
56
-
57
-
58
-
59
-
60
-
61
-
62
-
63
-
64
-
65
-
66
-
67
-
68
-
69
-
70
-
71
-
72
 |
 |