Meade Tripod LX600-ACF 14 inch User Manual - Page 17
Getting Started
 |
View all Meade Tripod LX600-ACF 14 inch manuals
Add to My Manuals
Save this manual to your list of manuals |
Page 17 highlights
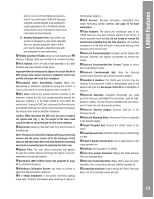
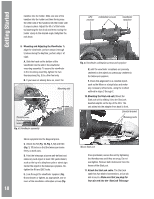
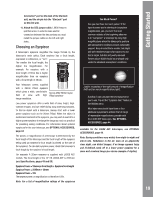
GETTING STARTED Getting Started Parts Listing replace the covers.) Getting the telescope ready for first light requires only a few minutes. When first opening the packing box, note carefully the following parts: ■ LX600 ACF telescope with fork mount system ■ AutoStar II handbox and interface coil cord; handbox holder ■ 8 x 50mm viewfinder assembly ■ Eyepiece holder and 1.25" diagonal prism ■ Series 4000 26mm Super Plössl eyepiece ■ OTA Counterweight(s) ■ DEC Jumper cables (2) ■ Anti-vibration pads (3) ■ 507 Connecting Cable ■ Variable height Giant Field Tripod and mounting base, threaded rod with T-handle tension knob, spacer cone and c-clip, and spreader bar ■ Set of hex keys ■ StarLock unit with cable ■ Instructional Manual and Software DVD. 3. Plug in the AutoStar II handbox: Be certain that the power switch on the computer control panel (Fig. 1, 13A) is in the OFF position. Plug the coil cord of the AutoStar II handbox into the HBX port (Fig. 1, 13F). Note: The AutoStar II handbox does not require batteries. The telescope supplies its power. 4. Remove the dust cap from the rear cell of the telescope. Thread the eyepiece holder into the rear cell thread. Slide the diagonal prism into the eyepiece holder and lock in place by turning the thumbscrew to a firm feel. 5. Insert eyepiece: Remove the Series 4000 26mm Super Plössl eyepiece (Fig. 1, 1) from its container and place it in the diagonal prism (Fig. 1, 3). Tighten the eyepiece holder thumbscrew (Fig. 1, 2) to a firm feel only. 6. Remove the travel screw. The LX600 is How to Assemble Your Telescope shipped with a travel screw in place to protect the primary mirror during shipping. Use the Assembly of the LX600 ACF telescope requires eight C-cell (usersupplied) batteries or the optional Universal AC Power Adapter (product# 07584) connected to a standard 115v home outlet or to an optional #607 Cigarette Lighter Adapter (see OPTIONAL ACCESSORIES, page 44). Plug an adapter into the 12vDC In port provided hex key to remove the screw. Replace the screw with the provided plastic cap. DO NOT ADJUST THE FOCUS KNOB BEFORE REMOVING THE TRAVEL SCREW OR DAMAGE TO YOUR TELESCOPE WILL OCCUR. of the computer control panel (Fig. 1, 13B). 7. Remove dust cover: Remove the dust cover Note that the LX600 features split fork arms allowing you the option of breaking the telescope down into to two, easier to (Fig. 1, 18) from the optical tube assembly (Fig. 1, 19) by gently prying it off. maneuver units. See Appendix D, Page 55 for details. 8. Attach the handbox holder: Remove the 1. Position the telescope: Start by turning the DEC lock (Pg. 10, Fig. 1, 17) counterclockwise to unlock the the optical tube (Fig. 1, 19). Next, move the optical tube through the fork arms to the position depicted in Fig. 1 and turn the DEC lock clockwise to a firm feel to relock the position handbox holder from the plastic bag. If necessary, loosen the lock knob (Fig. 3a, A) and place the clamp (Fig. 3a, B) about one of the fork arm handles (Fig. 1, 15). Tighten the lock knob to a firm feel. Slide the AutoStar II handbox into the holder (Fig. 3a, C). You may also snap the of the optical tube. 2. Install batteries: Remove the battery Ꭽ Ꭾ compartment covers (Fig. 1, 8) and carefully remove the battery holders, being mindful of the connector wires. Insert four user-supplied C-cell batteries into each battery holder, oriented as shown on the diagram on the battery slots Ꭿ inside the battery holder. Return the battery holders to their respective compartments and Figure 3a: Handbox holder: (A) Lock knob; (B) Clamp; (C) Holder. Fig. 3b: Handbox holder attached to fork arm handle. 17
-
 1
1 -
2
-
3
-
4
-
5
-
6
-
7
-
8
-
9
-
10
-
11
-
 12
12 -
 13
13 -
 14
14 -
 15
15 -
 16
16 -
 17
17 -
 18
18 -
 19
19 -
 20
20 -
 21
21 -
 22
22 -
23
-
24
-
25
-
26
-
27
-
28
-
29
-
30
-
31
-
32
-
33
-
34
-
35
-
36
-
37
-
38
-
39
-
40
-
41
-
42
-
43
-
44
-
45
-
46
-
47
-
48
-
49
-
50
-
51
-
52
-
53
-
54
-
55
-
56
-
57
-
58
-
59
-
60
-
61
-
62
-
63
-
64
-
65
-
66
-
67
-
68
-
69
-
70
-
71
-
72
 |
 |