Meade Tripod LX600-ACF 14 inch User Manual - Page 52
AutoStar #497 HANDBOX, Appendix B
 |
View all Meade Tripod LX600-ACF 14 inch manuals
Add to My Manuals
Save this manual to your list of manuals |
Page 52 highlights
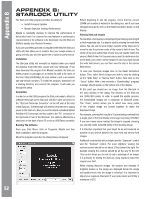
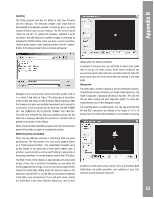
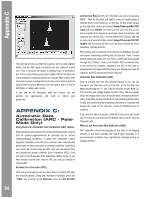
AutoStar #497ApHpAeNnDdiBxOBX APPENDIX B: STARLOCK UTILITY The StarLock Utility program provides the ability to: • Install Firmware Updates • Monitor StarLock Tracking Performance Meade is constantly working to improve the performance of the product and it is common for new features or performance improvements in the software to be developed. Use the StarLock Utility to update your Starlock firmware. If you use your telescope with a computer in the field, the StarLock utility will also allow you to monitor how your image session is going and help you tune the guide rate to optimize performance. Installation The StarLock utility will normally be installed when you install the Autostar Suite DVD that comes with your telescope. If you have download the program from Meade's website, the StarLock Utility program is packaged in an install file with a file name of the form StarLockUtilSetup_Vx.y.zip, where x and y are version and sub-version numbers. To install the program, download it to a working directory and execute the program. It will walk you through the setup. Connection In order to run the Utility program the StarLock needs to attach to a Meade telescope by the StarLock interface cable connected to the "StarLock Telescope Connector" on the left side of the back of the StarLock. The telescope will need to be turned on to supply power to the StarLock. Next you need to attach a standard Meade AutoStar #507 telescope interface cable to the "PC" connector on the right side of rear of the StarLock. This cable is attached to a serial port on the back of your PC or via an USB/Serial connector. Running The Software From your Start Menu, click on Programs, Meade and then StarLockUtility to start the program. . When the program executes, the dialog below will appear Before beginning to use the program, check that the correct COMM port number is entered in the dialog box, and if you have changed serial ports, click on the Reset Connection button on the display. Viewing StarLock Images To view StarLock images you should point your telescope at a bright or first magnitude star. It is best to start by viewing the wide field sensor. You can use the slow motion controls of the telescope to move the star the precise center of the sensor's field of view. The center of the your optical field of view may not exactly match the sensor's field of view. For this exercise you want to center your star on the StarLock's center, not the eyepiece's. Once you have viewed the wide field sensor, you can then view the star in the narrow field sensor. To view your StarLock images click on the Reset Connection button. Then, select which Imager you wish to view by clicking on the "Wide Field" or "Narrow Field" button. Now click on the "Focus" button. After a few seconds a "Downloading" progress message should appear on the bottom line of the display. At this point you should see an image from the StarLock in the main window of the dialog. The sensors on the StarLock are 1280x1024 pixels. In order to speed the update process, the downloaded images are a maximum of 320x240 pixels. The "Zoom" control allows you to select how many pixels of the original image are binned together to make the displayed image. For example, zooming 4x4 results in 16 pixels being combined into a single pixel of the final display and image size being 320x240. If you use a lower zoom number, the image is cropped, showing you only the center 320x240 pixels of the resulting image. It is therefore important that your target be as well centered as possible as you switch between the wide field and narrow field images. Additional controls that will be helpful are the "Exposure" control and the "Contrast" control. For most nighttime viewing the contrast control should be set about 2/3rds toward the right. For daylight viewing the contrast should be all the way to the left. This control allows you to look at only a subrange of an image. It is primarily for testing the StarLock using nighttime stars that may be very faint. When viewing StarLock images, the location and intensity of brightest feature in the image are displayed below the image and updated each time the image is refreshed. It is important to adjust your exposure downward if your peak values are hitting a maximum of 255. 52
-
 1
1 -
2
-
3
-
4
-
5
-
6
-
7
-
8
-
9
-
10
-
11
-
12
-
13
-
14
-
15
-
16
-
17
-
18
-
19
-
20
-
21
-
22
-
23
-
24
-
25
-
26
-
27
-
28
-
29
-
30
-
31
-
32
-
33
-
34
-
35
-
36
-
37
-
38
-
39
-
40
-
41
-
42
-
43
-
44
-
45
-
46
-
 47
47 -
 48
48 -
 49
49 -
 50
50 -
 51
51 -
 52
52 -
 53
53 -
 54
54 -
 55
55 -
 56
56 -
 57
57 -
58
-
59
-
60
-
61
-
62
-
63
-
64
-
65
-
66
-
67
-
68
-
69
-
70
-
71
-
72
 |
 |
