Meade Tripod LX600-ACF 14 inch User Manual - Page 56
AutoStar #497 HANDBOX, Appendix D
 |
View all Meade Tripod LX600-ACF 14 inch manuals
Add to My Manuals
Save this manual to your list of manuals |
Page 56 highlights
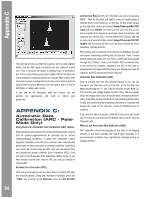
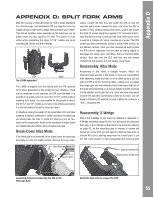
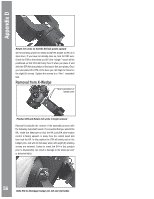
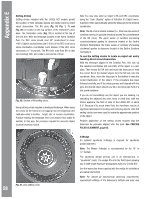
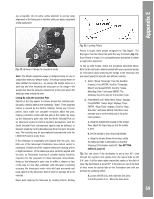
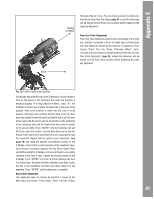
AutoStar #497ApHpAeNnDdiBxODX Rotate fork arms so that the RA lock points upward will be pointing upward to easily accept the hanger screw as it slips down. If you have not already done so, lock the DEC axis. Orient the OTA so that when you lift it the "hanger" screw will be positioned so that OTA will hang from it when you place it and slide the OTA fork arm plates on the base's fork arm plates. Once you have placed the OTA on the base you can begin to thread on the eight (8) screws. Tighten the screws to a "firm", consistent feel. Removal from X-Wedge Note orientation of hanger pins Position OTA and Rotate fork arms to begin removal Removal is basically the reverse of the assembly process with the following important caveat. It is essential that you unlock the RA, rotate the telescope so that the RA Lock/RA slow-motion control is facing upward, or away from the control panel and then lock the RA. In this position the OTA will safely rest on the hanger pins, and will not fall away when with eight (8) retaining screws are removed. Failure to orient the OTA in this position prior to disassembly can result in damage to the telescope and/ or personal injury. 56 Slide OTA to disengage hanger pin, left and right sides
-
 1
1 -
2
-
3
-
4
-
5
-
6
-
7
-
8
-
9
-
10
-
11
-
12
-
13
-
14
-
15
-
16
-
17
-
18
-
19
-
20
-
21
-
22
-
23
-
24
-
25
-
26
-
27
-
28
-
29
-
30
-
31
-
32
-
33
-
34
-
35
-
36
-
37
-
38
-
39
-
40
-
41
-
42
-
43
-
44
-
45
-
46
-
47
-
48
-
49
-
50
-
 51
51 -
 52
52 -
 53
53 -
 54
54 -
 55
55 -
 56
56 -
 57
57 -
 58
58 -
 59
59 -
 60
60 -
 61
61 -
62
-
63
-
64
-
65
-
66
-
67
-
68
-
69
-
70
-
71
-
72
 |
 |
