Meade Tripod LX600-ACF 14 inch User Manual - Page 25
AutoStar II Handbox
 |
View all Meade Tripod LX600-ACF 14 inch manuals
Add to My Manuals
Save this manual to your list of manuals |
Page 25 highlights
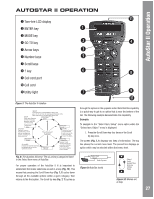
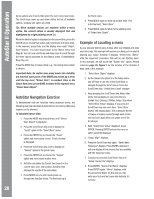
AutoStar II Handbox Press RET/GUIDE (Number key "7") to select this menu directly from Autostar II's keypad. This "Hot Key" provides the ability to control the StarLock system easily and directly from any place within the Autostar menus. From this key, you can: • Turn StarLock guiding on and off. Enable and disable StarLock High Precision Pointing • Monitor StarLock corrections • Set Different Guide Speeds Key to StarLock Indicator Lamps On the back surface of the StarLock assembly, between the two (2) receptacles is a single red LED indicator lamp. Below is a guide showing what the lamp blink patterns are indicating: • No illumination: StarLock is turned off, does not have power or is idle awaiting commands. • Blinking: StarLock is searching for a suitable guide star (either for guiding or HPP centering). • Solid: StarLock has located and locked onto a guide star. Focusers If you are using a secondary focuser, be sure that the focus lock is tightened once you have achieved focus. Crayford-style focusers are secured via pressure on a rolling pin. Too much force and the scope will not focus, to little and the focuser tube can shift as you scope tracks around the sky, especially with a heavy camera hanging off the end. Cameras Be sure your camera is securely attached to the telescope. Inserting the camera in a draw tube and tightening a single captive screw is a recipe for image shift. Draw tubes should have at least two and preferably three captive screws so the camera cannot shift when the scope moves about the sky. GoTo Saturn This exercise demonstrates how to select a celestial object, the planet Saturn, for viewing from AutoStar II's Solar System library. Objects in the eyepiece should maintain their position even though the Earth is rotating beneath the stars. In other words, the telescope tracks the chosen objects. Note: Saturn is not visible the entire year; you may need to choose another object from any of AutoStar II's many object libraries; however, the procedure, as described below, remains the same. 1 After the telescope is aligned, press Number key "5/SS". 2. "Solar System: Mercury" displays. Keep pressing the Scroll Down key until "Solar System: Saturn" displays. 3. Press ENTER. "Calculating" displays. Then "Saturn" and a set of coordinates displays. Note that Saturn's (and other planets') coordinates change throughout the year. 4. Press GO TO. "Saturn: Slewing..." displays and the telescope slews until it finds Saturn. You may need to use the Arrow keys to center Saturn precisely in the eyepiece. AutoStar II then automatically moves the telescope so that it "tracks" Saturn (or whatever other object you may have chosen); i.e., Saturn remains centered in the eyepiece. Using the Guided Tour The Guided Tour feature is an easy and fun method of exploring AutoStar II's GoTo capabilities. This example demonstrates using "Tonight's Best" Guided Tour. 1. After observing Saturn, keep pressing mode until "Select Item: Object" displays again. 2. Press the Scroll Down key twice. "Select Item: Guided Tour" displays. 3. Press ENTER. "Guided Tour: Tonight's Best" displays. Press ENTER. Note: If you wish to try out other Guided Tours, press the Scroll Down key to scroll through other tour choices. When the tour you wish to select displays, press ENTER. 4. "Tonight's Best: Searching..." displays. After calculating, "Tonight's Best: Jupiter" displays. Note: Different objects may be displayed on a tour list on any given night. 25
-
 1
1 -
2
-
3
-
4
-
5
-
6
-
7
-
8
-
9
-
10
-
11
-
12
-
13
-
14
-
15
-
16
-
17
-
18
-
19
-
 20
20 -
 21
21 -
 22
22 -
 23
23 -
 24
24 -
 25
25 -
 26
26 -
 27
27 -
 28
28 -
 29
29 -
 30
30 -
31
-
32
-
33
-
34
-
35
-
36
-
37
-
38
-
39
-
40
-
41
-
42
-
43
-
44
-
45
-
46
-
47
-
48
-
49
-
50
-
51
-
52
-
53
-
54
-
55
-
56
-
57
-
58
-
59
-
60
-
61
-
62
-
63
-
64
-
65
-
66
-
67
-
68
-
69
-
70
-
71
-
72
 |
 |
