Meade Tripod LX600-ACF 14 inch User Manual - Page 15
AutoStar II Features
 |
View all Meade Tripod LX600-ACF 14 inch manuals
Add to My Manuals
Save this manual to your list of manuals |
Page 15 highlights
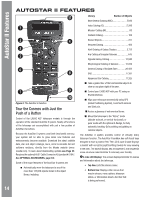
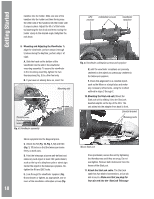
AutoStar II Features c ENTER Key: Press to go to the next menu level or to choose an option in a menu. The ENTER key is similar to the RETURN or ENTER key on a computer. See NAVIGATING AUTOSTAR II, page 30 and AutoStar II Menu Tree, page 29. d MODE Key: Press to return to the previous menu or data level. The top menu level is "Select Item". The MODE key is similar to the ESCAPE key on a computer. Note: Pressing MODE repeatedly while in the "Select Item" level moves AutoStar II to the topmost screen: "Select Item: Object". Note: If MODE is pressed and held for two seconds or more, information about the telescope's status displays. When the status displays, press the Scroll keys (Fig. 2, 7) to display the following information: • Right Ascension and Declination (astronomical) coordinates • Altitude (vertical) and Azimuth (horizontal) coordinates • Local Time and Local Sidereal Time (LST) • Timer and Alarm Status • Date • Site coordinates • Battery status Press MODE again to return to the previous menu. e GO TO Key: Press to slew (move) the telescope to the coordinates of the currently selected object. While the telescope is slewing, the operation may be aborted at any time by pressing any key except GO TO. Pressing GO TO again resumes the slew to the object. Also, press during the alignment or GO TO procedures to activate a "spiral search". To learn more about the GO TO function and performing a spiral search see Page 23. f Arrow Keys: The Arrow keys have several functions. Press an Arrow key to slew the telescope in a specific direction (up, down, left, and right), at any one of nine different speeds. See Slew Speeds, page 20. Use the Up and Down Arrow keys to move the telescope vertically up and down. The Left Arrow key rotates the telescope horizontally counterclockwise, while the Right Arrow key rotates it clockwise (unless reversed for Southern Hemisphere use). Also, use the Arrow keys to scroll through numbers 0 through 9 and the alphabet. The Down Arrow key begins with the letter "A", the Up Arrow key begins with digit "9". Additionally, use the Arrow keys to to move the cursor across the display: Use the Right or Left Arrow key (Fig. 2, 5) to move the cursor from one number to the next in the display. g Number Keys: Press to input digits 0 to 9. Each Number key also has a specific function, which is printed on each key (these are commonly known as "hot buttons"-see page 36): 1 SPEED: Changes the slew speeds. To operate, press Speed and then a Number key (1 is the slowest speed, 9 is highest speed). To learn about changing slew speed see Page 20. 2 CALD (Caldwell): Press to display the Caldwell catalog on the AutoStar II handbox. 3 M (Messier): Press to display the Messier catalog library. 4 Focus: Press to display the Focus Control menu. 5 SS: Press to display the Solar System library. 6 STAR: Press to display the Star library. 7 RET (Reticle): Press to display the StarLock Control menu. To learn about the StarLock menu see Page 32. 8 IC: Press to display the Index Catalog library. 9 NGC (New General Catalog): Press to display the NGC catalog library. 0 LIGHT: Press to turn on and off the red utility light on the top of the hand-box. h Scroll Keys: Press to access options within a selected menu. The menu is displayed on the first line of the screen. Options in the menu are displayed, one at a time, on the second line. Press the Scroll keys to move through the options. Press and hold a Scroll key to move quickly through the options. The Scroll keys also control the speed of text scrolling on the AutoStar II display. When text is scrolling, press and hold the Up Scroll key for a faster display speed and the Down Scroll key for a slower display speed. i ? Key: Press to access the "Help" file. "Help" provides on-screen information on how to accomplish whatever task is currently active. Press the ? key and then follow the prompts on the display to access details of AutoStar II functions in the Help feature. The Help system is essentially an on-screen instruction manual. If you have a question about an AutoStar II operation, e.g., INITIALIZATION, ALIGNMENT, etc., press the ? key and follow 15
-
 1
1 -
2
-
3
-
4
-
5
-
6
-
7
-
8
-
9
-
 10
10 -
 11
11 -
 12
12 -
 13
13 -
 14
14 -
 15
15 -
 16
16 -
 17
17 -
 18
18 -
 19
19 -
 20
20 -
21
-
22
-
23
-
24
-
25
-
26
-
27
-
28
-
29
-
30
-
31
-
32
-
33
-
34
-
35
-
36
-
37
-
38
-
39
-
40
-
41
-
42
-
43
-
44
-
45
-
46
-
47
-
48
-
49
-
50
-
51
-
52
-
53
-
54
-
55
-
56
-
57
-
58
-
59
-
60
-
61
-
62
-
63
-
64
-
65
-
66
-
67
-
68
-
69
-
70
-
71
-
72
 |
 |
