Meade Tripod LX600-ACF 14 inch User Manual - Page 42
Two-Star Alt-az Alignment, One-Star Alt-az Alignment
 |
View all Meade Tripod LX600-ACF 14 inch manuals
Add to My Manuals
Save this manual to your list of manuals |
Page 42 highlights
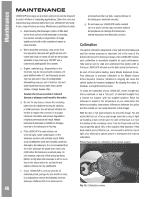
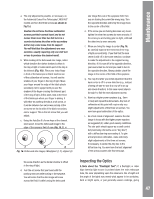
AdvanAcuetdoSAtuatro#St4a9r7IIHFAeNatDuBrOesX move the telescope until the star is visible and centered in the eyepiece. Press ENTER. Repeat the procedure for the second alignment star. Note: See WHICH ONE'S THE ALIGNMENT STAR, page 23, for some important tips concerning alignments stars and using your viewfinder. When the procedure is performed correctly, "Alignment Successful" displays. If AutoStar does not display this message, perform this procedure again. (Keep pressing MODE until "Align: Easy" displays and repeat the procedure.) Two-Star Alt-az Alignment Two-Star Alignment requires some knowledge of the night sky. AutoStar II provides a library of bright stars and two stars from this library are chosen by the observer for alignment. In this procedure, AutoStar II does not automatically find home, level, or North. 1. Select Alignment. Select "Align: Two Star" from the Setup menu. Press ENTER. 2. Set Home Position. Place the telescope in the home position. 3. To Set the Home Position Manually: a. See Figs. 12 and 13. Loosen the telescope's DEC lock (Pg. 10, Fig. 1, 17). Set the optical tube to 0° on the DEC setting circle (Fig. 1, 20). b. Tighten the DEC lock (Fig. 1, 17) to a firm feel only. c. Level the tripod base. d. Move the base of the telescope so that the computer control panel (Fig. 1, 13) approximately faces South. North Fig. 13. DEC circle at 0° e. Unlock the RA lock (Fig. 1, 12) and turn the telescope's optical tube horizontally until it points North. f. Re-lock the RA lock (Fig. 1, 12). Press ENTER. g. Press ENTER. 4 . Star Alignment. "Select Star" displays. AutoStar II then displays a library of stars for the observer to choose from. Use the Scroll keys to scroll to a star on the list that you wish to align upon - select a star that you can easily locate in the night sky. Press ENTER. 5. Center Star. The telescope slews to the star. Use the Arrow keys to move the telescope until the star is centered in the eyepiece. Press ENTER. 6. Center Star. Repeat procedure for a second alignment star. Once ENTER is pressed, the telescope is aligned and you are now ready to use AutoStar's II GO TO capabilities for a night of observing. One-Star Alt-az Alignment One-Star Alignment requires some knowledge of the night sky. AutoStar II provides a library of bright stars. One-Star Alignment is identical to Two-Star Alt-az: Alignment (above), except only one star from the database is chosen by the observer for alignment. Level DEC setting base circle NOTE: OTA should be level. Fig. 12. Alt-az home position 42
-
 1
1 -
2
-
3
-
4
-
5
-
6
-
7
-
8
-
9
-
10
-
11
-
12
-
13
-
14
-
15
-
16
-
17
-
18
-
19
-
20
-
21
-
22
-
23
-
24
-
25
-
26
-
27
-
28
-
29
-
30
-
31
-
32
-
33
-
34
-
35
-
36
-
 37
37 -
 38
38 -
 39
39 -
 40
40 -
 41
41 -
 42
42 -
 43
43 -
 44
44 -
 45
45 -
 46
46 -
 47
47 -
48
-
49
-
50
-
51
-
52
-
53
-
54
-
55
-
56
-
57
-
58
-
59
-
60
-
61
-
62
-
63
-
64
-
65
-
66
-
67
-
68
-
69
-
70
-
71
-
72
 |
 |
