Meade Tripod LX600-ACF 14 inch User Manual - Page 62
AutoStar #497 HANDBOX, Appendix F
 |
View all Meade Tripod LX600-ACF 14 inch manuals
Add to My Manuals
Save this manual to your list of manuals |
Page 62 highlights
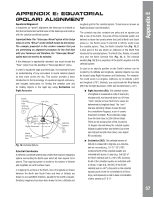
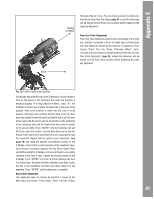
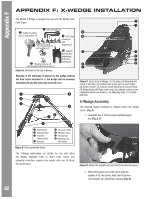
APPENDIX F: X-WEDGE INSTALLATION AutoStar #497ApHpAeNnDdiBxOFX The Meade X-Wedge is designed for use with the Meade Giant Field Tripod. B Hex wrenches (3) C Center mounting bolt (1) and washer (1) F 5/16" hex screws (3) and E 3/8" hex screws (3) and washers (3) washers (3) G Tangent arm (1) and connecting 8-32 hex D Threaded rod cap (1) and threaded rod sleeve insert (1) screws (2) Figure A. Hardware kit for the X-Wedge. Warning: If the telescope is placed on the wedge without the field tripod attached to it, the wedge will be seriously overbalanced and the telescope could tip over. B I C D E HG F B Tripod Head C Threaded Rod D T-handle Tension Knob E Spreader F Leg Lock Knobs G Extension Strut H Tension Hub I Retaining clip (not visible) Figure B. Fully assembled tripod. The X-Wedge instructions are written for use with either the Meade Standard Field or Giant Field Tripod. The assembly procedure requires two people who can lift about 55 pounds each. B C 1! 1) J D E F I G H Figure C. Parts of the X-Wedge. (1) Tilt-plate; (2) Mounting slot at top of tilt plate; (3) Latitude lock screw (one on each side); (4) Vernier pointer; (5) Latitude Scale; (6) Azimuth Control Knob; (7) Wedge Body; (8) Plate center hole; (9) Latitude control screw (adjustment knob not shown); (10) Mounting slots; (11) Center bolt hole. X-Wedge Assembly The required wedge hardware is shipped within the wedge carton (Fig. A). 1. Locate the two 8-32 hex screws and the tangent arm (Fig. A, 6). Figure D. Attach the tangent arm with the flat surface facing up. 2. Attach the tangent arm to the tripod using the supplied 8-32 hex screws. Note: the flat surface of the tangent arm should face upwards (Fig. D). 62
-
 1
1 -
2
-
3
-
4
-
5
-
6
-
7
-
8
-
9
-
10
-
11
-
12
-
13
-
14
-
15
-
16
-
17
-
18
-
19
-
20
-
21
-
22
-
23
-
24
-
25
-
26
-
27
-
28
-
29
-
30
-
31
-
32
-
33
-
34
-
35
-
36
-
37
-
38
-
39
-
40
-
41
-
42
-
43
-
44
-
45
-
46
-
47
-
48
-
49
-
50
-
51
-
52
-
53
-
54
-
55
-
56
-
 57
57 -
 58
58 -
 59
59 -
 60
60 -
 61
61 -
 62
62 -
 63
63 -
 64
64 -
 65
65 -
 66
66 -
 67
67 -
68
-
69
-
70
-
71
-
72
 |
 |
