Meade Tripod LX600-ACF 14 inch User Manual - Page 55
Appendix D
 |
View all Meade Tripod LX600-ACF 14 inch manuals
Add to My Manuals
Save this manual to your list of manuals |
Page 55 highlights
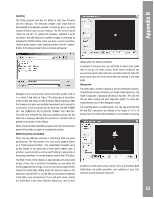
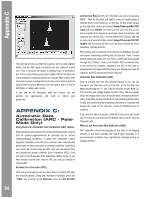
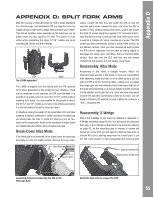
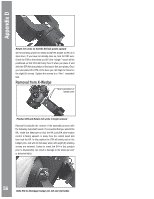
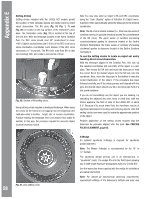
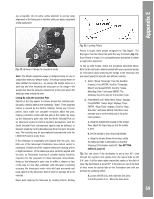
Appendix D APPENDIX D: SPLIT FORK ARMS With the removal of eight (8) boltss the OTA is easily separated from the telescope. This detachable OTA is a departure from the original design LX200 series design that preceded your LX600. This feature facilities easier assembly as the telescope can be broken down into two, easier to lift units. This feature is most useful when assembling the larger 12"/14" models and when mounting the LX600 onto the X-Wedge. cables. Loosen the DEC lock and rotate the OTA so that the objective points down, towards the base, and relock the DEC to prevent it from rotating during break-down. Locate and loosen the eight (8) screws using the supplied 5/16" hex head wrench. Note that there are four screws per side, with a fifth screw which is used as a "hanger pin" when mounting on a wedge. This fifth screw has been permanently locked in place at the factory; do not attempt removal. Once you have removed all eight screws the OTA can be separated from the base by sliding slightly to disengage the hanger pins and lifting. Place on flat and stable surface. Note that only the DEC lock fork arm will remain immobilized; the opposite arm will always swing freely. Reassembly: Altaz Mode OTA Base The LX600 separated The LX600 is shipped from the factory with the OTA fastened to the base. Depending on the model and your situation, it may not be necessary to ever separate the OTA from the base. It is possible for a single person to mount the 10"/12" models without breaking them down. It is also possible for two people to mount the 10"/12" and 14" models as one unit. In the previous scenarios it is not necessary to break the telescope down. In situations where the weight of the assembled OTA and base presents a physical challenge to safely mounting the telescope you should take the time to break the telescope into its two, easier to lift components. Below is the procedure to break-down and reassemble the LX600's OTA and telescope base. Break-Down Altaz Mode If the telescope is not mounted on the tripod, place the telescope assembly on a flat and stable surface. Remove the two jumper Reassembly in this mode is straight forward. Attach the telescope base securely to the tripod or if you are reassembling after observing, make sure that it is on a stable surface. Lift and slide the OTA onto the mounting plates, making sure to engage the hanger pins into their dedicated slots. Remember that one of the arms will swing freely, so it may be helpful to enlist someone to help stabilize and locate that arm. Once you have determined that the OTA has been successfully located on the base, you can begin to thread on the eight (8) screws. Tighten the screws to a "firm", consistent feel. Reassembly: X-Wedge Attach the X-Wedge to the tripod as detailed in Appendix F: X-Wedge Installation (page 62-66). You will mount the telescope base only, to the X-Wedge as described in the procedure starting on page 63. As the mounting plate is indexed to receive the hanger pin on the OTA, you will need to rotate the fork arms so that the RA Lock is pointing away from the control panel. Lock the RA in this position. In this configuration the receiving slots Hex Head fasteners - four per side. Hanging Pin - two per side. Slots to receive Pin Note position of RA lock Loosening fasteners connecting the OTA to the telescope base Orient the fork arms to receive the OTA 55
-
 1
1 -
2
-
3
-
4
-
5
-
6
-
7
-
8
-
9
-
10
-
11
-
12
-
13
-
14
-
15
-
16
-
17
-
18
-
19
-
20
-
21
-
22
-
23
-
24
-
25
-
26
-
27
-
28
-
29
-
30
-
31
-
32
-
33
-
34
-
35
-
36
-
37
-
38
-
39
-
40
-
41
-
42
-
43
-
44
-
45
-
46
-
47
-
48
-
49
-
 50
50 -
 51
51 -
 52
52 -
 53
53 -
 54
54 -
 55
55 -
 56
56 -
 57
57 -
 58
58 -
 59
59 -
 60
60 -
61
-
62
-
63
-
64
-
65
-
66
-
67
-
68
-
69
-
70
-
71
-
72
 |
 |
