Meade Tripod LX600-ACF 14 inch User Manual - Page 23
One-star Polar Alignment, Syncing your Eyepiece or Camera, using Starlock
 |
View all Meade Tripod LX600-ACF 14 inch manuals
Add to My Manuals
Save this manual to your list of manuals |
Page 23 highlights
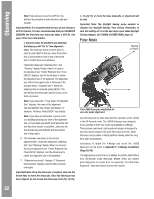
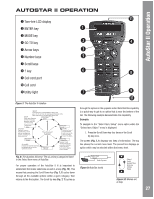
Observing Tip: The GO TO key also allows you to perform a "spiral search". A spiral search is useful when the telescope slews to an object, but that object is not visible in the eyepiece after the telescope finishes its search. (This sometimes occurs during an alignment procedure.) Press GO TO when the telescope stops slewing. The telescope begins to move in a spiral pattern at a very slow speed around the search area. Look through the eyepiece and when the object does become visible, press MODE to stop the spiral search. Then use the Arrow keys to center the object. One-star Polar Alignment Setup the telescope facing true North with the tripod level. Use the altitude adjustment knob on the X-Wedge to set your latitude. Make sure the telescope is set to Polar mode in the Autostar Setup/Telescope/Mount Menu (See page 32). Turn on the power to the telescope and when the AutoStar II handbox displays "Press 0 to Align, Mode for Menu", press "0". The AutoStar II will ask you to place the telescope in the polar home position. Polar home position is where the DEC axis is at 90 degrees (telescope tube pointing directly away from the drive base and parallel to the fork arms) and the RA axis is at 0:00 hour angle (rotate the RA axis to put the viewfinder on the underside of the telescope tube and the base of the fork arms is parallel to the ground). Press "ENTER" and the telescope will get GPS time, date and location, and will then slew near to the star Polaris. Find Polaris in the viewfinder (it is very important to have the viewfinder aligned with the optics of your telescope. See page 18) and using the azimuth and altitude controls on the X-Wedge, center Polaris on the crosshairs of the viewfinder. Now, look through a low power eyepiece like the 26mm Super Plössl and further adjust the X-Wedge controls until Polaris is accurately centered in the field of view. Relock the X-Wedge locking screws. Press "ENTER" to confirm and the telescope will slew to a second star. Using the AutoStar II handbox slew keys, center the star in the viewfinder and then accurately center it in the eyepiece. Press "ENTER" and the alignment is complete. Tip: To manually enter the RA and DEC coordinates of an object: Press and hold MODE for two seconds or more. The RA and DEC coordinates display. Press GO TO. "Object Position" and a set of coordinates displays. Then enter the RA and DEC coordinates of any celestial object using Number keys. As soon as the coordinates are entered, AutoStar II slews the telescope to the coordinates. Note that the telescope must be initialized for this procedure to operate properly. Which One's the Alignment Star? If AutoStar II has chosen an alignment star with which you are unfamiliar, how can you be sure if the star in your eyepiece is really the alignment star? The rule of thumb is that an alignment star is usually the brightest star in that area of the sky. If you perform a GO TO to an alignment star and you're not sure if you have located the alignment star or it isn't in the eyepiece, look through your viewfinder. When you view an alignment star in the viewfinder, it stands out dramatically from the rest of the stars in that portion of the sky. The viewfinder will help you locate a star more quickly than the eyepiece, because it has a much wider field of view than the eyepiece. Using AutoStar II, set the slew speed to 6 or higher and use the Arrow keys to center the alignment star in the viewfinder. If your viewfinder has been aligned with the telescope, the alignment star should now be in the eyepiece. Set the slew speed to 4 or less and center the star in the eyepiece. Syncing your Eyepiece or Camera using Starlock Whenever you change eyepieces, diagonals or cameras, the center field of view may shift slightly. Starlock can compensate for this slight difference by performing the following routine: 1. Press the MODE key several times, until "Select Item: Object" is displayed. 2. Press the ENTER key to choose the "Object" option and move down four (4) levels. "Object: Star" is displayed. 3. Press the ENTER key to choose the "Star" option and move down one (1) level. "Named" is displayed. 3. Press the ENTER key to choose the "Named" option. 4. Scroll thorough the lists of Named star until you come to a bright star that is visible (if you are not sure what to choose use the same star that AutoStar used during the alignment procedure). Press the GOTO key to choose that star. 5. The telescope will slew to that star. When slewing has been completed, re-center the star in the eyepiece or camera. Then hold the "ENTER" key for 2 seconds. Then press "ENTER" again to confirm your position. StarLock will now compensate for the offset. 23
-
 1
1 -
2
-
3
-
4
-
5
-
6
-
7
-
8
-
9
-
10
-
11
-
12
-
13
-
14
-
15
-
16
-
17
-
 18
18 -
 19
19 -
 20
20 -
 21
21 -
 22
22 -
 23
23 -
 24
24 -
 25
25 -
 26
26 -
 27
27 -
 28
28 -
29
-
30
-
31
-
32
-
33
-
34
-
35
-
36
-
37
-
38
-
39
-
40
-
41
-
42
-
43
-
44
-
45
-
46
-
47
-
48
-
49
-
50
-
51
-
52
-
53
-
54
-
55
-
56
-
57
-
58
-
59
-
60
-
61
-
62
-
63
-
64
-
65
-
66
-
67
-
68
-
69
-
70
-
71
-
72
 |
 |
