Meade Tripod LX600-ACF 14 inch User Manual - Page 18
AutoStar #497 HANDBOX, Getting Started
 |
View all Meade Tripod LX600-ACF 14 inch manuals
Add to My Manuals
Save this manual to your list of manuals |
Page 18 highlights
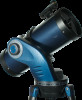
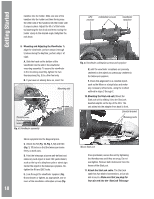
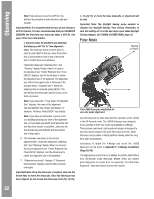
AutoStar #G4et9t7inHgASNtDarBtOedX handbox into the holder: Slide one side of the handbox into the holder and then firmly press the other side of the handbox into the holder until it snaps in place. Adjust the tilt of of the holder by loosening the lock knob and then moving the holder clamp to the desired angle. Retighten the lock knob. 9. Mounting and Adjusting the Viewfinder. To align the viewfinder, perform steps A through E below during the daytime; perform step F at night. A. Slide the track on the bottom of the viewfinder into the slot in the viewfinder mounting assembly. To secure the viewfinder to the mounting assembly, tighten the two thumbscrews (Fig. 9) to a firm feel only. B. If you have not already done so, insert the Mounting slot Thumbscrews Viewfinder base locking screws Fig. 4. Viewfinder assembly Track 26mm eyepiece into the diagonal prism. C. Unlock the RA (Pg. 10, Fig. 1, 12) and DEC (Fig. 1, 17) locks so that the telescope moves freely on both axes. D. Point the telescope at some well-defined and stationary land object at least 200 yards distant, such as the top of a telephone pole or street sign. Center the object in the telescope eyepiece. Retighten the RA and DEC locks. E. Look through the viewfinder eyepiece (Fig. 5) and loosen or tighten, as appropriate, one or more of the viewfinder collimation screws (Fig. 18 GPS Collimation screws receiver Viewfinder eyepiece Fig. 5. Viewfinder collimation screws and eyepiece 5) until the viewfinder crosshairs are precisely centered on the object you previously centered in the telescope eyepiece. F. Check this alignment on a celestial object, such as the Moon or a bright star, and make any necessary refinements, using the method outlined in steps C through E. 10. Mounting the StarLock unit. Mount the StarLock unit by sliding it into the StarLock dovetail adapter on the top of the OTA. The unit slides into the adapter from back to front. Dovetail bracket Retaining bolts Mount StarLock Once positioned, secure the unit by tightening the thumbscrews until they are snug. Do not overtighten. Remove both dustcovers from the lenses of the StarLock. 11. Attach the StarLock cable. The StarLock cable has two distinct connections, a four-pin and a six-pin. Make sure that you plug the four-pin end into the "StarLock Telescope
-
 1
1 -
2
-
3
-
4
-
5
-
6
-
7
-
8
-
9
-
10
-
11
-
12
-
 13
13 -
 14
14 -
 15
15 -
 16
16 -
 17
17 -
 18
18 -
 19
19 -
 20
20 -
 21
21 -
 22
22 -
 23
23 -
24
-
25
-
26
-
27
-
28
-
29
-
30
-
31
-
32
-
33
-
34
-
35
-
36
-
37
-
38
-
39
-
40
-
41
-
42
-
43
-
44
-
45
-
46
-
47
-
48
-
49
-
50
-
51
-
52
-
53
-
54
-
55
-
56
-
57
-
58
-
59
-
60
-
61
-
62
-
63
-
64
-
65
-
66
-
67
-
68
-
69
-
70
-
71
-
72
 |
 |
