Meade Tripod LX600-ACF 14 inch User Manual - Page 65
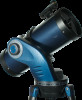
b. Using the Azimuth Control Knob Fig C
 |
View all Meade Tripod LX600-ACF 14 inch manuals
Add to My Manuals
Save this manual to your list of manuals |
Page 65 highlights
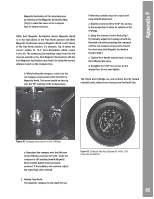
Appendix F Magnetic Declination of the observing area by referring to the Magnetic Declination Map (Fig O). Locate this value on the compass face for future reference. NOTE: East Magnetic Declination means Magnetic North is to the right (East) of the True North position and West Magnetic Declination means Magnetic North is left (West) of the True North position. For example, Fig. N shows the correct setting for 13.5° East Declination which covers Irvine, CA. The compass scale markings range from 0 to 360 degrees azimuth so for East Magnetic Declinations add the East Magnetic Declination value from 0 to obtain the correct reference mark on the compass face. b. While holding the compass, rotate it so the red compass arrow points in the direction of Magnetic North. The arrow should be directly over the "N" marking on the compass face. Follow these simple steps for a quick and easy azimuth alignment. a. Slightly loosen the three 5/16" hex screws in the wedge floor to allow for rotation of the X-Wedge. b. Using the Azimuth Control Knob (Fig C, 6), manually adjust the X-wedge around the threaded rod (without moving the compass) until the red compass arrow points toward the observing sites Magnetic Declination found in step 1. c. Tighten the t-handle tension knob, locking the X-Wedge into place. d. Retighten the 5/16" hex screws on the wedge floor. Do not over tighten. The tripod and X-Wedge are now pointed directly toward celestial north, without ever having seen the North Star. Figure M. Compass level placed on the X-Wedge. c. Now place the compass onto the flat base of the X-Wedge as shown in Fig M. Verify the compass is still pointing toward Magnetic North and the bubble level is properly centered. If the bubble is not centered, adjust the tripod legs until centered. Figure N. Compass bearing adjusted for Irvine, CA's magnetic declination. 2. Finding True North: The magnetic compass is now ready for use. 65
-
 1
1 -
2
-
3
-
4
-
5
-
6
-
7
-
8
-
9
-
10
-
11
-
12
-
13
-
14
-
15
-
16
-
17
-
18
-
19
-
20
-
21
-
22
-
23
-
24
-
25
-
26
-
27
-
28
-
29
-
30
-
31
-
32
-
33
-
34
-
35
-
36
-
37
-
38
-
39
-
40
-
41
-
42
-
43
-
44
-
45
-
46
-
47
-
48
-
49
-
50
-
51
-
52
-
53
-
54
-
55
-
56
-
57
-
58
-
59
-
 60
60 -
 61
61 -
 62
62 -
 63
63 -
 64
64 -
 65
65 -
 66
66 -
 67
67 -
 68
68 -
 69
69 -
 70
70 -
71
-
72
 |
 |
