Meade Tripod LX600-ACF 14 inch User Manual - Page 28
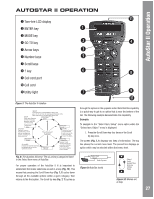
AutoStar #497 HANDBOX, AutoStar II Operation
 |
View all Meade Tripod LX600-ACF 14 inch manuals
Add to My Manuals
Save this manual to your list of manuals |
Page 28 highlights
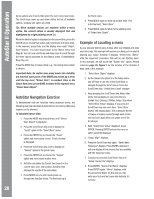
AutoASuttaorSt#a4r9I7I HOApeNrDatBiOonX Some options are choices that select the next menu level down. The Scroll keys move up and down within the list of available options, showing one option at a time. Tip: When multiple choices are available within a menu option, the current option is usually displayed first and highlighted by a right pointing arrow (>). When the desired option is displayed on the second line, press the ENTER key to choose that option and move down one menu level. In the example, press Enter and the display now reads "Object: Solar System." You have moved down to the Object menu level (Fig. 9). You can now use the up and down keys to scroll through the other options available for the Objects menu: Constellations, Deep Sky, etc. Press the MODE key to leave a level; e.g., the wrong menu option is chosen. Important Note: No matter how many levels into AutoStar are traveled, each press of the MODE key moves up a level, until the top level, "Select Item", is reached. Once in the Select Item level, press MODE to return to the topmost level, "Select Item: Object". AutoStar Navigation Exercise To demonstrate how the AutoStar menu structure works, the following exercise calculates Sunset time so an evening observing session can be planned. To Calculate Sunset time: 1. Press the MODE key several times, until "Select Item: Object" is displayed. 2. Press the Scroll Down key once to display the "Event" option in the "Select Item" menu. 3. Press the ENTER key to choose the "Event" option and move down a level. "Event: Sunrise" is displayed. 4. Press the Scroll Down key once to display the "Sunset" option in the Event menu. 5. Press the ENTER key to choose the "Sunset" option and move down another level. 6. AutoStar calculates the Sunset time based on the current date, time, and location. AutoStar then displays the results of the calculation. 7. Press MODE once to start moving back up through the AutoStar levels. The first level up is the Event menu. 8. Press MODE again to move up another level. This is the top level, "Select Item". 9. Press MODE again to return to the starting point of "Select Item: Object". Example of Locating a menu As you typically will be using menus after you initialize and align your telescope, this example will assume you have just completed aligning your scope. AutoStar II displays "Select Item: Object" after the alignment procedure; this will be our starting point. In this example, we will locate the "Owner Info" option. Please reference page 25, figure 7 for the location of the Autostar II keys used in this example. 1. "Select Item: Object" displays. 2. As the Owner Info option is in the Setup menu, you will have to use one of the Scroll keys to navigate through the list of menus. Press the Scroll Down Key. "Select Item: Event" displays 3. Keep pressing the Scroll Down key. Notice that all the menus display as you press the key: Guided Tour, Glossary, Utilities, Setup. Stop when "Select Item: Setup" displays. If you press the Scroll Down key one more time, "Select Item: Object" will display again. This is because the list of menus or options cycles through each choice over and over again when you press one of the Scroll keys. 4. With "Select Item: Setup" displayed, press ENTER. Pressing ENTER selects the menu or option currently displayed. 5. "Setup: Align" displays. 6. Press the Scroll Down key again. "Select Item: Telescope" displays. Press ENTER. Autostar II will now display all the choices that are available with the Telescope menu. 7. Continue to press the Scroll Down key until "Setup: Owner Info" displays. 8. Press ENTER. "Owner Info: Name" displays. Press ENTER again. "Name" displays, with the second line blank. On this line you may enter your first and last name into Autostar II's memory. 28
-
 1
1 -
2
-
3
-
4
-
5
-
6
-
7
-
8
-
9
-
10
-
11
-
12
-
13
-
14
-
15
-
16
-
17
-
18
-
19
-
20
-
21
-
22
-
 23
23 -
 24
24 -
 25
25 -
 26
26 -
 27
27 -
 28
28 -
 29
29 -
 30
30 -
 31
31 -
 32
32 -
 33
33 -
34
-
35
-
36
-
37
-
38
-
39
-
40
-
41
-
42
-
43
-
44
-
45
-
46
-
47
-
48
-
49
-
50
-
51
-
52
-
53
-
54
-
55
-
56
-
57
-
58
-
59
-
60
-
61
-
62
-
63
-
64
-
65
-
66
-
67
-
68
-
69
-
70
-
71
-
72
 |
 |
