Meade Tripod LX600-ACF 14 inch User Manual - Page 9
Quick Start
 |
View all Meade Tripod LX600-ACF 14 inch manuals
Add to My Manuals
Save this manual to your list of manuals |
Page 9 highlights
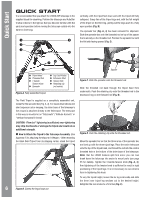
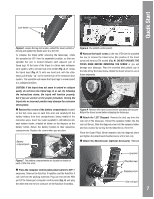
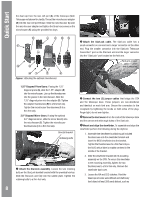
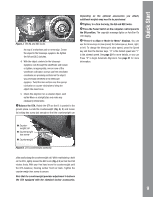
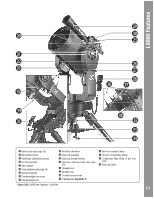
Quick Start B C RA lock Figure J. The RA and DEC locks. DEC lock the top of a telephone pole or street sign. Center the object in the telescope eyepiece. Re-tighten the RA and DEC clutches. 4. With the object centered in the telescope eyepiece, look through the viewfinder and loosen or tighten, as appropriate, one or more of the viewfinder collimation screws until the viewfinder crosshairs are precisely centered on the object you previously centered in the telescope eyepiece. Twist the rear section near the eyecup clockwise or counter-clockwise to bring the object into clear focus. 5. Check this alignment on a celestial object, such as the Moon or a bright star, and make any necessary refinements. 1@ Balance the OTA. Rotate the OTA so that it is parallel to the ground plane. Locate the counterweight (Fig. K, 3) and loosen its locking hex screw just enough so that the counterweight can Depending on the optional accessories you attach, additional weights may need to be purchased. 1# Tighten, to a firm feel only, the RA and DEC locks. 1$ Press the Power Switch on the computer control panel to the ON position. The copyright message lights on AutoStar II's LCD display. 1% "Press 0 to Align or Mode for Menu" displays. You can use the Arrow keys to slew (move) the telescope up, down, right, or left. To change the telescope's slew speed, press the Speed key and then the Number keys. "9" is the fastest speed and "1" is the slowest speed. See page 20 for more details, or you can Press "0" to begin Automatic Alignment. See page 21 for more information. B Counterweight rail C Counterweight hex screw D Counterweight Figure K. OTA counterweight assembly. slide easily along the counterweight rail. While maintaining a hold on the OTA, lightly loosen the DEC Lock (Fig.J, 2) so that the OTA rotates freely. With your free hand move the counterweight until the OTA balances; favoring neither front nor back. Tighten the counter weight hex screw to secure. Note that the counterweight provides adjustment to balance the OTA equipped with the standard factory accessories. 9
-
 1
1 -
2
-
3
-
 4
4 -
 5
5 -
 6
6 -
 7
7 -
 8
8 -
 9
9 -
 10
10 -
 11
11 -
 12
12 -
 13
13 -
 14
14 -
15
-
16
-
17
-
18
-
19
-
20
-
21
-
22
-
23
-
24
-
25
-
26
-
27
-
28
-
29
-
30
-
31
-
32
-
33
-
34
-
35
-
36
-
37
-
38
-
39
-
40
-
41
-
42
-
43
-
44
-
45
-
46
-
47
-
48
-
49
-
50
-
51
-
52
-
53
-
54
-
55
-
56
-
57
-
58
-
59
-
60
-
61
-
62
-
63
-
64
-
65
-
66
-
67
-
68
-
69
-
70
-
71
-
72
 |
 |
