Meade Tripod LX600-ACF 14 inch User Manual - Page 64
Setting the Observing Latitude, Aligning the Magnetic Compass
 |
View all Meade Tripod LX600-ACF 14 inch manuals
Add to My Manuals
Save this manual to your list of manuals |
Page 64 highlights
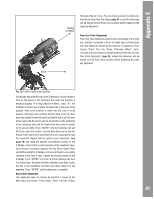
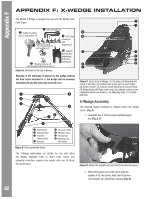
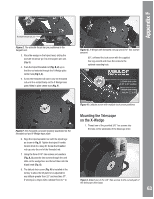
AutoStar #497ApHpAeNnDdiBxOFX base. The desired hole is located at the curved end of the telescope drive base (see Fig. I). Be sure to leave approx, 3/4" of the screw exposed to allow for clearance of the wedge tilt plate. 2. Grasp the two fork arms of the telescope firmly, with the control panel toward the floor, place the telescope onto the wedge tilt plate (Fig.C, 1) by sliding the mounting screw on the telescope base into the slot at the top tilt plate (Fig. J). tighten all three 3/8" hex screws at this time. Do not overtighten. Figure L. Use the provided hex wrench to secure the three 3/8" hex screws into the telescope drive base. The telescope is now fully mounted onto the wedge and field tripod. Adjustments in wedge latitude angle and/or azimuth orientation may be made with the telescope in place. Figure J. The telescope drive base placed on the X-Wedge tilt plate. 3. Insert the center mounting bolt (Fig. K) through the center of the underside of the tilt plate and into the underside of the drive base. Firmly tighten the bolt. Do not overtighten. Note: It is important to insert the center mounting bolt into the wedge-telescope assembly. The center mounting bolt insures the precise pointing accuracy of the X-Wedge. Setting the Observing Latitude Look up the latitude of the desired observing site (most road maps show latitude lines). Then, loosen the latitude lock screws (Fig. C, 3) and rotate the fine latitude control knob (Fig. C, 9) while reading the latitude scale (Fig. C, 5). The latitude pointer is a vernier scale (Fig. C, 4) which will allow the tilt angle to be set to within 0.25°. When the tilt plate is aligned with the desired latitude, tighten the latitude locking screws. Figure K. Attaching the center mounting bolt. 4. Insert the two remaining 3/8" hex screws through the underside of the tilt plate (Fig. L) and into the underside of the drive base. Firmly 64 Aligning the Magnetic Compass With the aid of the magnetic compass, a telescope can be polar aligned in locations where the view of Polaris is obstructed or even before the skies get dark. The compass face has an angular scale from 0 to 360 degrees which will be useful in adjusting for the local angle of Magnetic Declination-the difference between Magnetic North (which the compass shows) and true north (where the telescope should be pointed). Note: Magnetic Declination should not be confused with the astronomical term "Declination" which, when used with "Right Ascension," describes the celestial coordinate system. 1. Setting Magnetic Declination: a. In order to obtain an accurate reading using the compass, you first need to determine the
-
 1
1 -
2
-
3
-
4
-
5
-
6
-
7
-
8
-
9
-
10
-
11
-
12
-
13
-
14
-
15
-
16
-
17
-
18
-
19
-
20
-
21
-
22
-
23
-
24
-
25
-
26
-
27
-
28
-
29
-
30
-
31
-
32
-
33
-
34
-
35
-
36
-
37
-
38
-
39
-
40
-
41
-
42
-
43
-
44
-
45
-
46
-
47
-
48
-
49
-
50
-
51
-
52
-
53
-
54
-
55
-
56
-
57
-
58
-
 59
59 -
 60
60 -
 61
61 -
 62
62 -
 63
63 -
 64
64 -
 65
65 -
 66
66 -
 67
67 -
 68
68 -
 69
69 -
70
-
71
-
72
 |
 |
